
A simple walkthrough for creating effective Google Analytics Goals to track your progress.
Do you have goals as a blogger? I’m not talking about aspirations, hopes and dreams like, “I want to be as cool as Michael Hyatt some day.” I’m talking about the kind of goals you can track through Google Analytics.
Not that I don’t fully support dreaming big and trying to be as cool as Michael Hyatt. On the contrary, you definitely need to have big dreams, goals and aspirations.
And let’s face it, what blogger doesn’t want to be Michael Hyatt?
What I’m talking about in this post, though, are tangible, trackable, and quantifiable goals. The kinds of goals that allow you to benchmark your progress and know whether or not what you’re doing is taking you in the direction of your bigger, less tangible goals. Or even more importantly— if your blogging is even paying off at all.

I want to walk you though a handful of goals that I believe every blogger needs to have and how to track them using Google Analytics. They’re really very simple, and more advanced bloggers may want to dive deeper if needed.
But let’s just start with the basics, shall we?
What are some basic blogging goals I should have?
Well, firstly, every blogger should have some basic metrics to gauge how well they’re doing at getting people to their content. These aren’t an actual Google Analytics Goal type metrics, they’re more or less just metrics you’ll want to keep an eye on and maybe just have a mental goal of how much you want to improve them every month.
Those metrics I’m talking about are things such as:
- Sessions
- Pageviews
- Avg. Session Duration
- Pages per Session
- Bounce Rate
In fact, you should definitely have a Google Analytics Dashboard set up for all of these things as well as the goals I’m going to show you how to set up. To make it super easy for you, I’ve gone ahead and created a template out of my go-to GA Dashboard that you can apply to your own site in just a few clicks.
What to get access to this dashboard template? Join my email newsletter by adding your email below, and I’ll send you the link to the Google Analytics Dashboard Template I use on all my blogs.
You can, of course, take the time to create your own dashboard, but this template will save you lots of time in having to do it manually.
Now, one thing to keep in mind is that traffic is meaningless unless it’s translating to some sort of conversion goal. Typically these conversion goals are email signups or a purchase of some sort. And the only way you can actually tell if what you’re doing is paying off is by setting up some conversion-based goals inside your Google Analytics account.
This is actually easier to do than you might realize, and I’m going to walk you through the basic types of goals you should set up immediately.
How to Set Up Google Analytics Goals
There are a number of different ways to set up goals inside of Google Analytics, but I’m only going to focus on two different approaches that are quick and easy to set up for even the most inexperienced blogger.
For both of these goal types we’re going to be using an email subscriber as the goal, meaning we will tell Google Analytics to monitor and track each time we gain a new subscriber to our email lists.
Now, this presumes you have some sort of email subscribe form that you place throughout your site. My form plugin of choice is Ninja Forms (affiliate link), and I highly recommend it. The reason I recommend it so highly is because it allows you to create highly customizable forms that do exactly what you need them to do with a beautiful and easy-to-use interface.
To connect it to my email list, powered by MailChimp (referral link), there is a Ninja Forms MailChimp add-on that makes for super smooth integration. Be sure that whatever form plugin you’re using is connected to your email list software of choice.
With that said, let’s get started with our first goal.
Creating a Destination Goal
The first and easiest way to set up a email subscriber goal is to create a form that will redirect the person signing up to some sort of Thank You page. With Ninja Forms, this is as easy as setting a Redirect action.
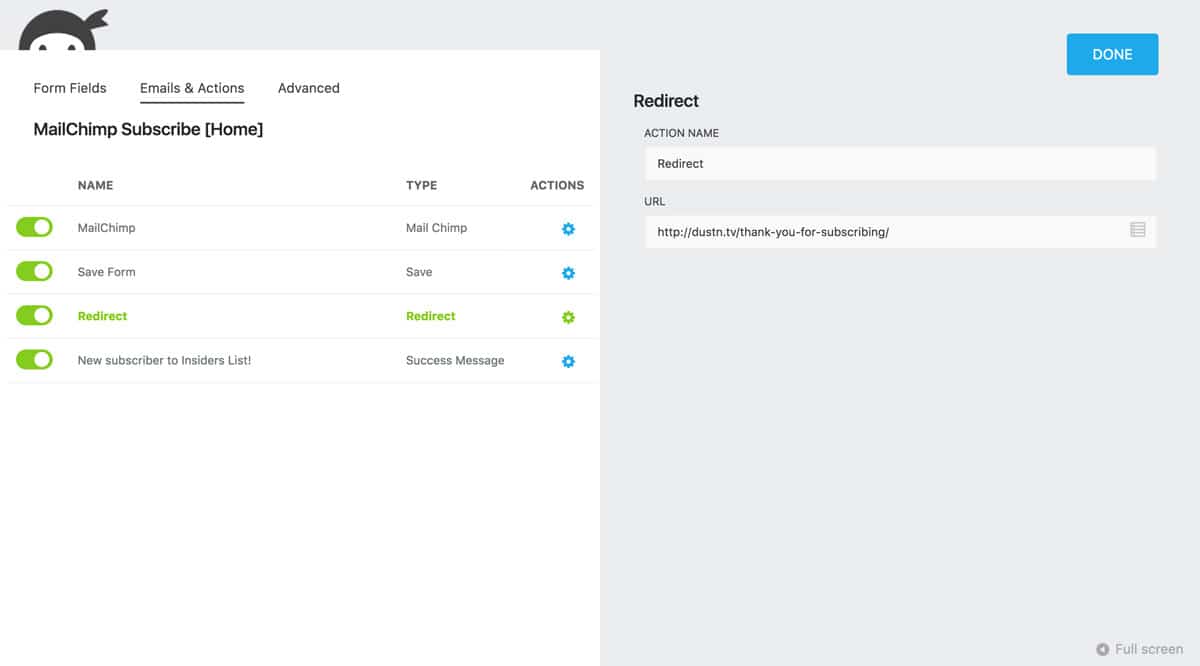
If you’re using a different kind of form builder that doesn’t have this ability, I recommend switching to a better form plugin or skipping to the next section.
Once you have this form redirection set up, you can head over to your Google Analytics account and navigate to your Admin tab.
Now, from your Admin tab it’s only going to take six simple steps to set up your first goal.
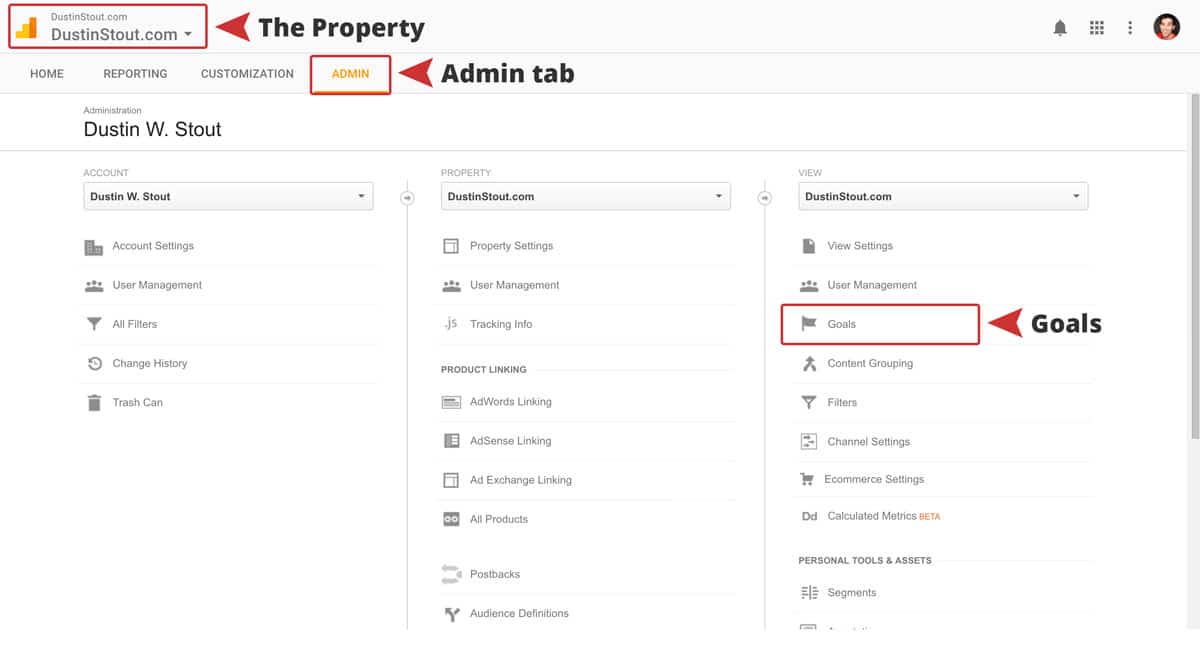
Step 1: Click on the Goals tab in the third column. This will take you to a page that lists all the goals that Google Analytics is tracking.
Step 2: If you don’t have any goals set up yet, click on the New Goal button at the top of the list box.
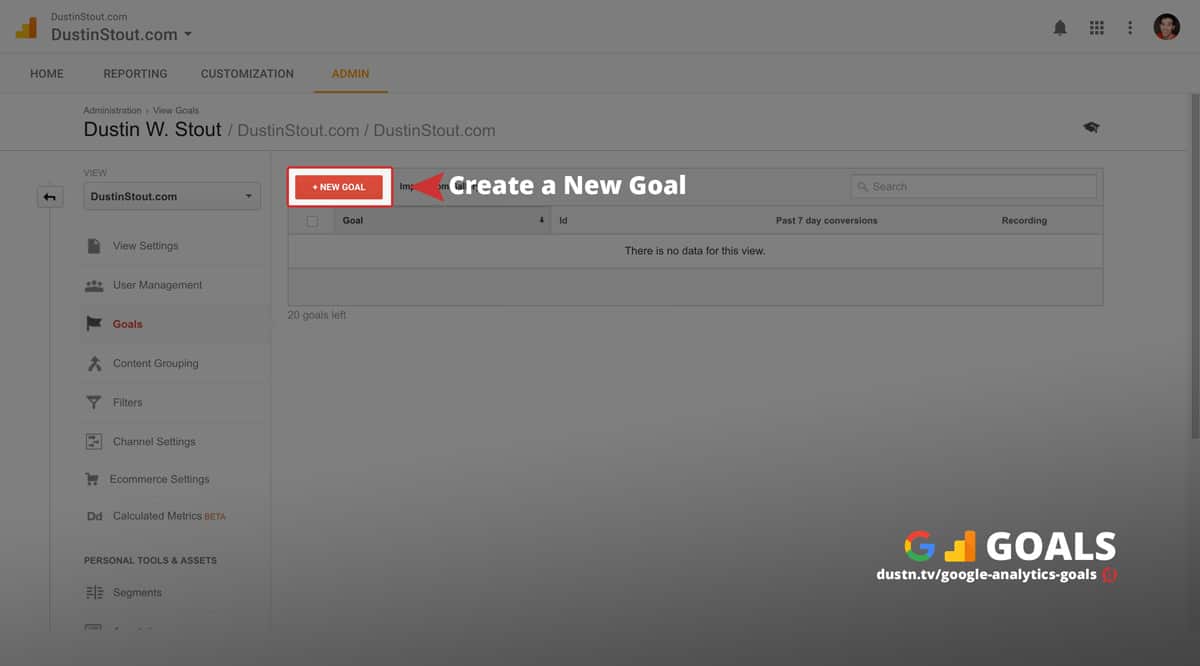
If you already have some goals in there that you’re not using, you can simply click on them to modify those goals and reconfigure them to do what we’ll talk about next.
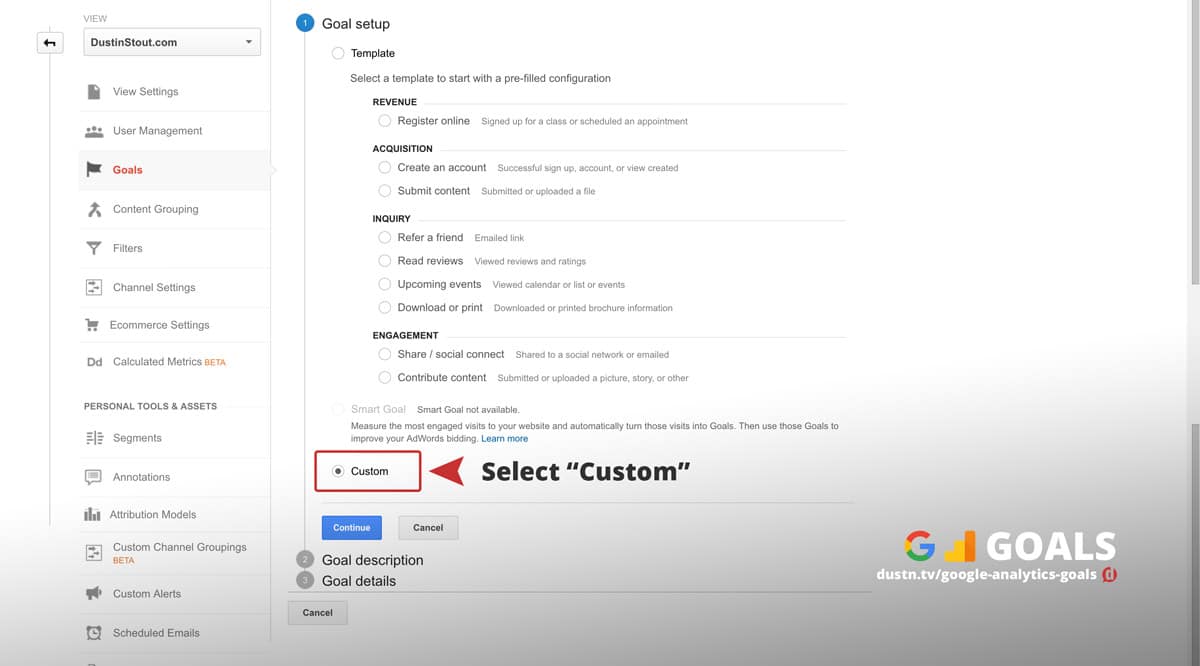
Step 3: Google Analytics will first have you choose whether you want to use a Template for a goal or create a Custom goal. Choose Custom and then click the blue Continue button.
Step 4: Set the Name of your goal. This will only be for your purposes, so just name it something simple and specific so you can easily remember what it’s for.
I like to add “(Redirect)” to the end of my redirect goals, just so I know exactly what type of goal it is when listed among my other goals.
Step 5: Under Type make sure you select Destination and then click the blue Continue button.

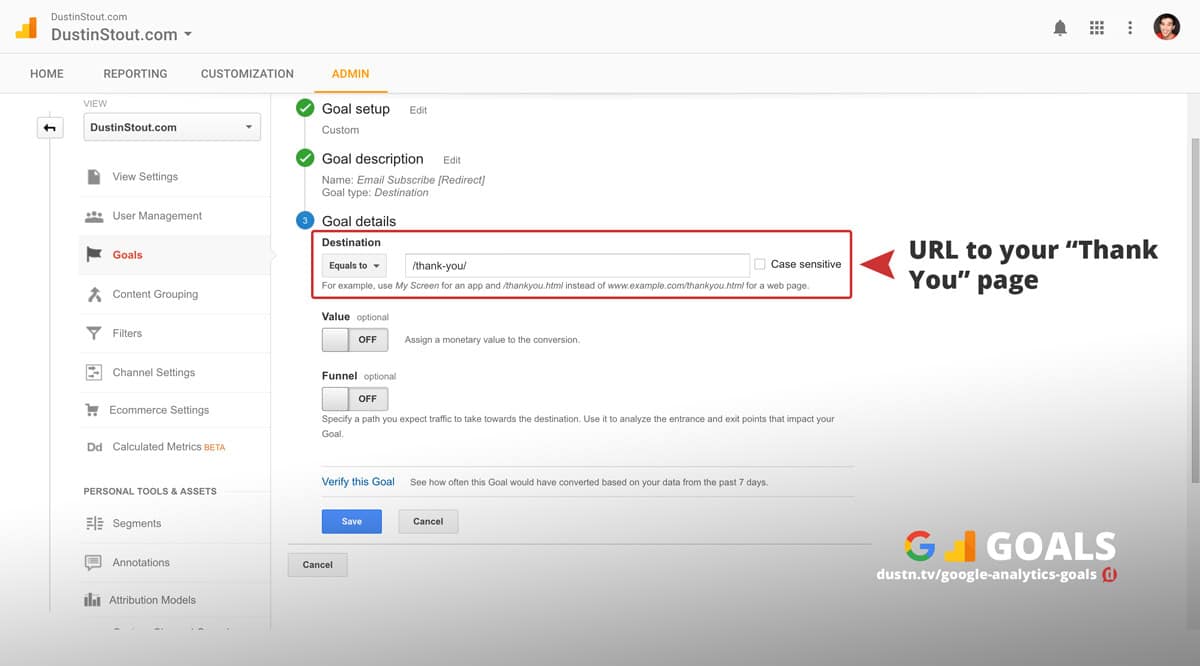
Step 6: In the Goal Details section you can then set the Destination (the URL of your Thank You page). All you need to do is enter the last part of your slug.
So, for example, if your Thank You page address was located at yourdomain.com/thank-you/ then all you would need to enter into the box is /thank-you/.
You can then optionally decide to add a Value and Funnel to this goal, but I recommend not doing this unless you have a deep understanding about how these work and how to apply them to your personal goals. So, for the purposeses of this tutorial, we’ll skip it.
Now, just hit the blue Save button and you’re all done!
You’ve now officially got your first Google Analytics Goal set up and will be able to track every single time someone fills out one of your forms and gets redirected to your Thank You page!
But what if you don’t want to redirect people to a Thank You page when they fill out your subscribe form? Or what if your form builder doesn’t allow you to create redirects?
Well, if you happened to have filled out my form above for the bonus Google Analytics Dashboard template, you would have noticed that you do not get redirected— just a success message letting you know your gift is on the way to your inbox.
If you want to know how to track these types of forms, read on, dear reader.
Track Form Submission Goals without a Redirect
If you’re using the popular WordPress Contact Form 7, they make it extremely easy to add an Event to your forms. This is essentially something that is triggered and recorded in Google Analytics every time a form is submitted and all you need to do is add a simple line of code in the designated area of your form builder.
For those of us who don’t have a form builder that has this easy integration, we have to come up with another solution—we have to create our own Google Analytics event. And boy-oh-boy it was not easy figure out.
I searched the entire internet and couldn’t find a tutorial or simple script that anyone has build to easily add to your site and track form submissions. The reason is because it’s a little complicated and not 100% fool proof. But in my opinion it’s better to track something than nothing.
So, with the help of Kyle from Ninja Forms, David from Confluent Forms, and Nick from Warfare Plugins, we were able to come up with a dead simple piece of code that, when placed in your sites Footer will allow you to create a simple Event that fires off every time a form is submitted on your site.
<script>
  jQuery( document ).ready( function() {
    jQuery( document )
    .on('click', 'input[type=button]', function() {
    ga('send', 'event', 'Email List', 'Subscribed', 'New Subscriber');
    });
  });
</script>
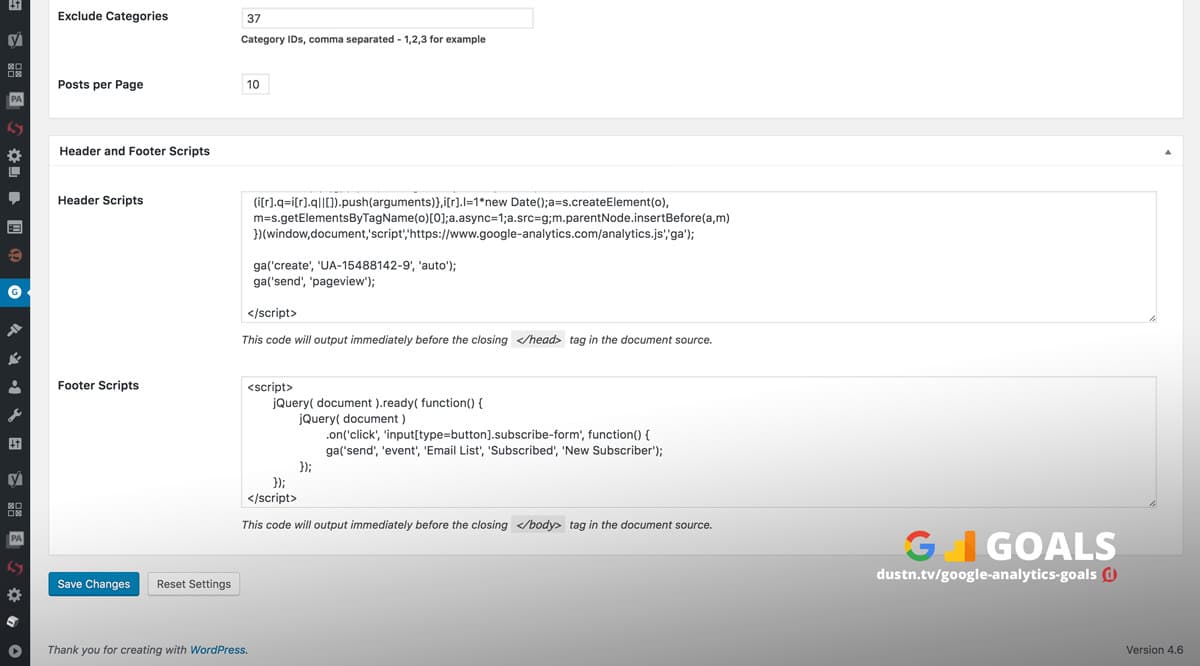
Just place this into your theme’s footer so that it is output on every one of your pages.
If you’re using Genesis Theme (affiliate link) they make this super easy. Just head over to your Theme Options tab and scroll down to the Footer Scripts section and paste the above code in.
Now, what this Event is tracking is actually the act of clicking the Submit button (or whatever the button is that submits the form). So just make sure that your form’s button is an input with a type="button" on it.
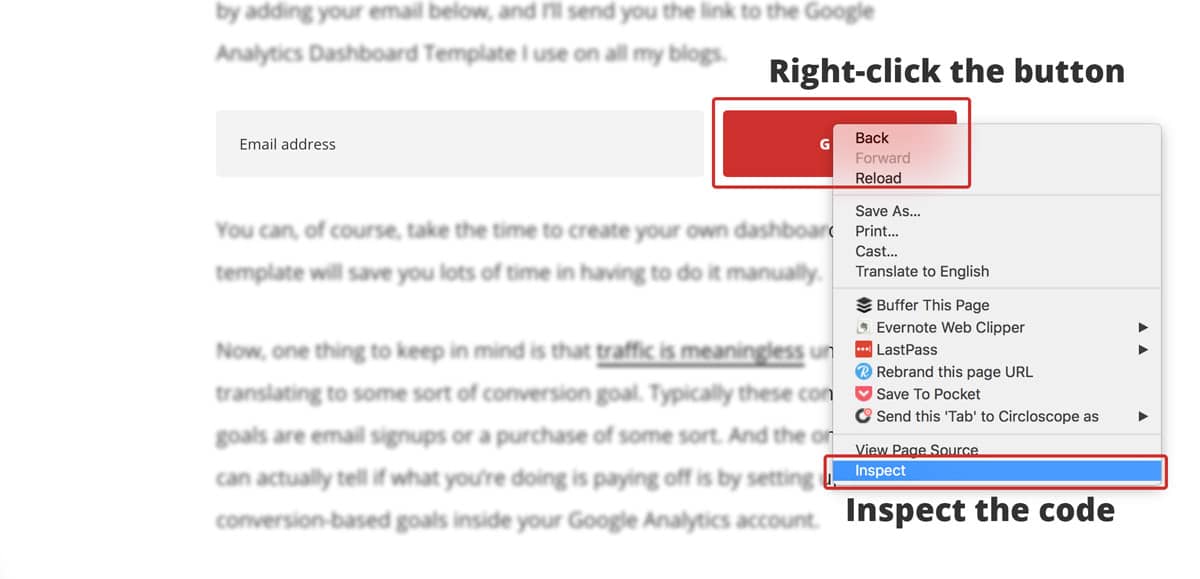
If you’re not sure about this you can use your browsers Inspect Element feature:
- Right-click the button on the page
- Select the Inspect Element (Chrome) option
- Look at the button’s code and it should look like the following image
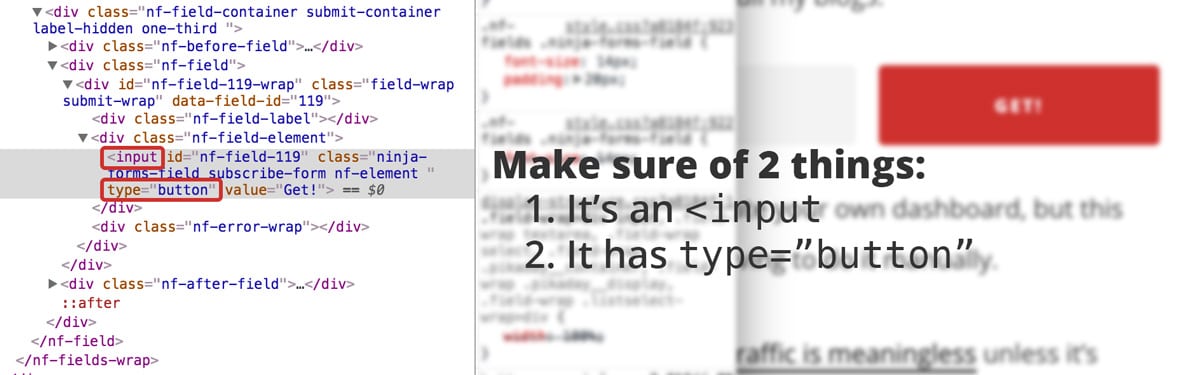
If your button is an input element with a type="button" then you’re all set. If not, you’ll need to consult the developers of your form plugin.
If done correctly, Google Analytics will record an Event with the following parameters:
- Event Category: Email List
- Event Action: Subscribed
- Event Label: New Subscriber
If you’re using Ninja Forms, Quay has created a tutorial for Google Analytics Event Tracking for Ninja Forms that doesn’t require any code. For some reason I couldn’t get this to work, but if you want to give it a shot before you try the script route, it’s very easy to follow.
Bonus: Kyle has created a free Ninja Forms add-on plugin that you can download via his Github that will add Google Analytics events to all successful Ninja Forms submissions.
You can then create a Goal for this event using the following 6 steps.
Step 1: Just like the previous goal you need to head to the Admin tab of your Google Analytics property and click on Goals.
Step 2: Click the New Goal button.
Step 3: Under Goal Setup select the Custom option and then click the blue Continue button.
Step 4: Name your goal appropriately.
Step 5: Under Type select the Event option and then click the blue Continue button.
Step 6: In the Goal Details section fill out the exact Category, Action and Label I’ve listed above for this Event. It will look like this:
CategoryEquals toEmail ListActionEquals toSubscribedLabelEquals toNew Subscriber
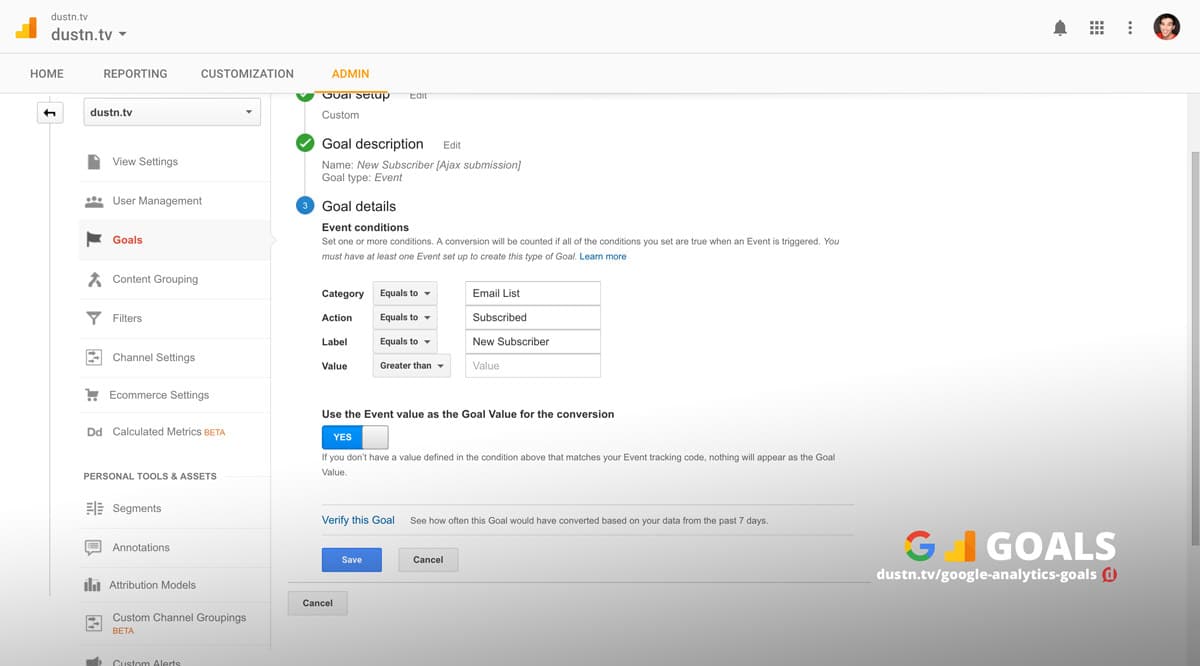
Once you’ve done this, you can click the blue Save button and you’re all set!
You will now be tracking all form submissions on your site. Woo-hoo!
Now, the drawback to this is that even if someone gives a bad email address or the submission has an error and doesn’t go through, the Event will still fire as if it were successful. Additionally, if you also have forms that redirect throughout your site, these will also be counted which means if you have a redirect Goal set up also, those forms will be counted as double.
To fix this, you can add one little modification to both the code above and your non-redirect forms to ensure that only these forms are tracked by the event.
First, you’ll need to add a CSS class to the Submit button. In my forms I just used a simple .subscribe-form class. With Ninja Forms you can do this by clicking on the button element in the form editor and adding the class under Display.

The tracking script then looks like this:
<script>
  jQuery( document ).ready( function() {
    jQuery( document )
    .on('click', 'input[type=button].subscribe-form', function() {
    ga('send', 'event', 'Email List', 'Subscribed', 'New Subscriber');
  });
 });
</script>
If you want to use a different class or already have forms that contain a specific class on your Submit buttons, you can change the script accordingly to have that class.
Bonus Goal: Social Shares

Now, this is only going to be for those bloggers who are interested in getting their content shared and tracking how well their content is at making that happen. More shares lead to more traffic and more traffic leads to more conversions of all kinds.
So, it stands to reason that most bloggers want more social shares, but they just haven’t thought to set it up as a Goal in their Google Analytics. Why? Because most people are using a social sharing plugin that someone else created and the people who created it didn’t have this in mind.
Unless you’re using Social Warfare. As co-founder of Social Warfare, this was a feature I really wanted added into the plugin. So we did, and people are loving it!
As a Social Warfare user, all you need to do is turn this feature on.
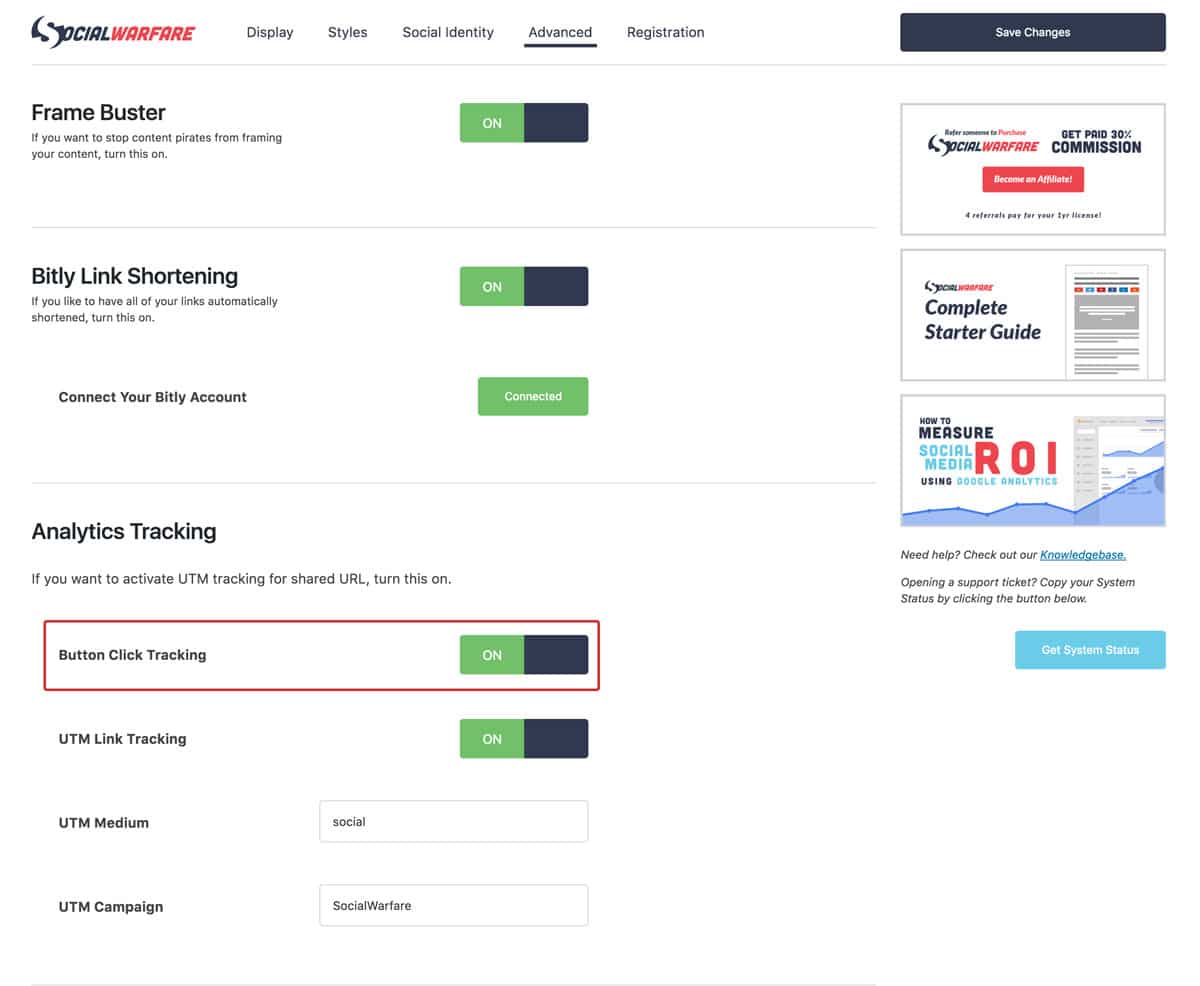
Once this feature is turned on, Google Analytics will record an event for every time one of your social sharing buttons is clicked. You can then go about creating an Event Goal just like we did above. When you get to the Goal Details portion of creating it, here’s the parameters you want to fill out:
CategoryEquals tosocial_mediaActionBegins withswp_
Pay special attention to the case-sensitivity and also the trailing _ (underscore) on the Event Action.
And that’s it. You can now see how well every blog post is “converting” to social shares.
Reading Your Google Analytics Conversion Reports
So why go through all this trouble to create goals and track conversions? Because these are the things that show you whether or not what you’re doing is working.
If you’re cranking out content regularly and it’s not getting any shares, it’s time to change up your content. But how would you know for certain unless you’re tracking this?
If you’re creating lead magnets and content upgrades but only 1 out of 1,000 people who see them are signing up, it’s time to change your approach. But how will you know unless you are tracking it?
The reason you set up these goals and track them is to understand if what you’re doing is actually working. This way you can continually improve your efforts, hence the phrase:
If you can’t measure it, you can’t improve it.
Conclusion
Once you’ve set up your Google Analytics Goals you can now begin analyzing and quantifying the traffic that you’re getting. You can see exactly how well you’re doing at turning visitors into subscribers or customers.
Are you going to be setting up some new Google Analytics Goals? Let me know in the comments below.
Leave a Reply
You must be logged in to post a comment.