How to Write a Blog Post: An Epic Process for Epic Results

wooden desk, laptop, notebook, ipad with how to write a blog

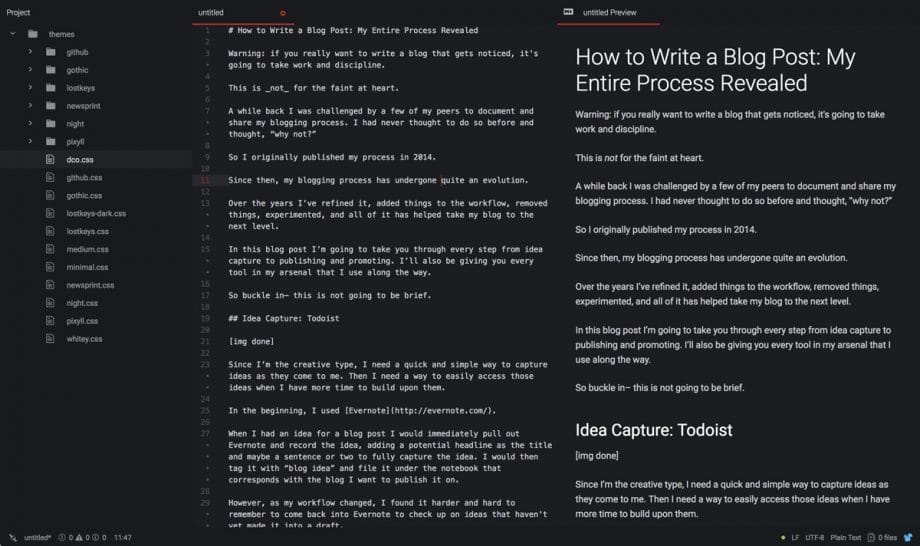
Warning: if you really want to know how to write a blog post that gets noticed, it’s going to take work and discipline.

This is not for the faint at heart.

A while back I was challenged by a few of my peers to document and share my blogging process. I had never thought to do so before and thought, “why not?”

So I originally published my process in 2014.

Since then, my blogging process has undergone quite an evolution.

Over the years I’ve refined it, added things to the workflow, removed things, experimented, and all of it has helped take my blog to the next level.

In this blog post I’m going to take you through every step from idea capture to publishing and promoting. I’ll also be giving you every tool in my arsenal that I use along the way.

So buckle in– this is not going to be brief.

Idea Capture: Todoist

Todoist app screenshot

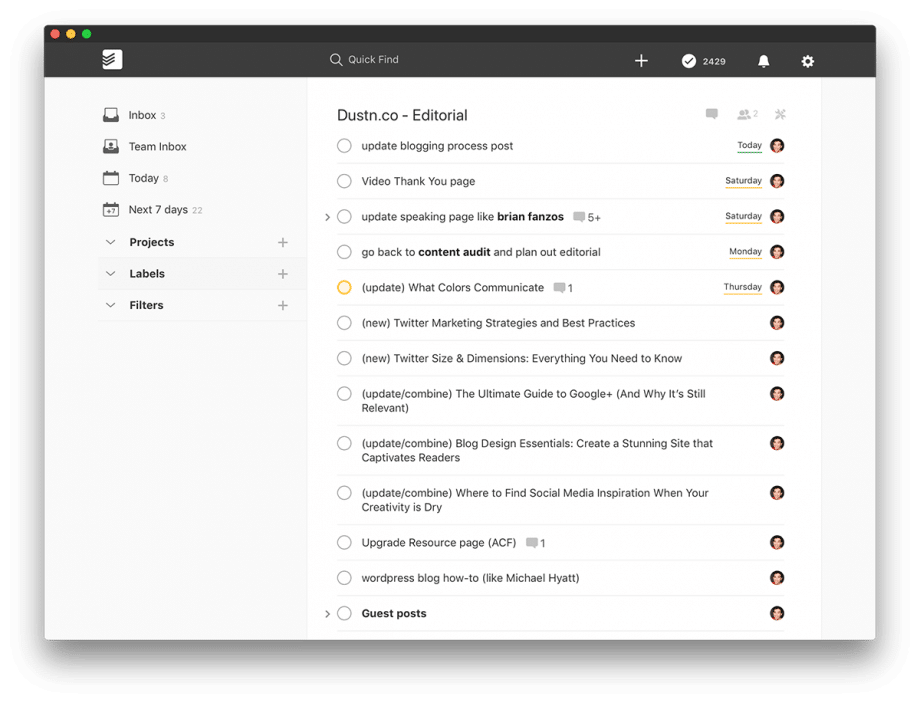
Since I’m the creative type, I need a quick and simple way to capture ideas as they come to me. Then I need a way to easily access those ideas when I have more time to build upon them.

In the beginning, I used Evernote.

When I had an idea for a blog post I would immediately pull out Evernote and record the idea, adding a potential headline as the title and maybe a sentence or two to fully capture the idea. I would then tag it with “blog idea” and file it under the notebook that corresponds with the blog I want to publish it on.

However, as my workflow changed, I found it harder and hard to remember to come back into Evernote to check up on ideas that haven’t yet made it into a draft.

Instead, these days I now use Todoist for all idea capture.

The reason this works better than Evernote is because instead of creating a note, I’m actually creating a task for myself, that ensures I’m going to follow through with the idea.

Because of Todoist’s simple natural language processing, I can whip out my phone (or use the desktop app) and type out something like this:

#dustn.co idea: how to write a blog tomorrow

Screenshot of Todoist creating a task for how to write a blog

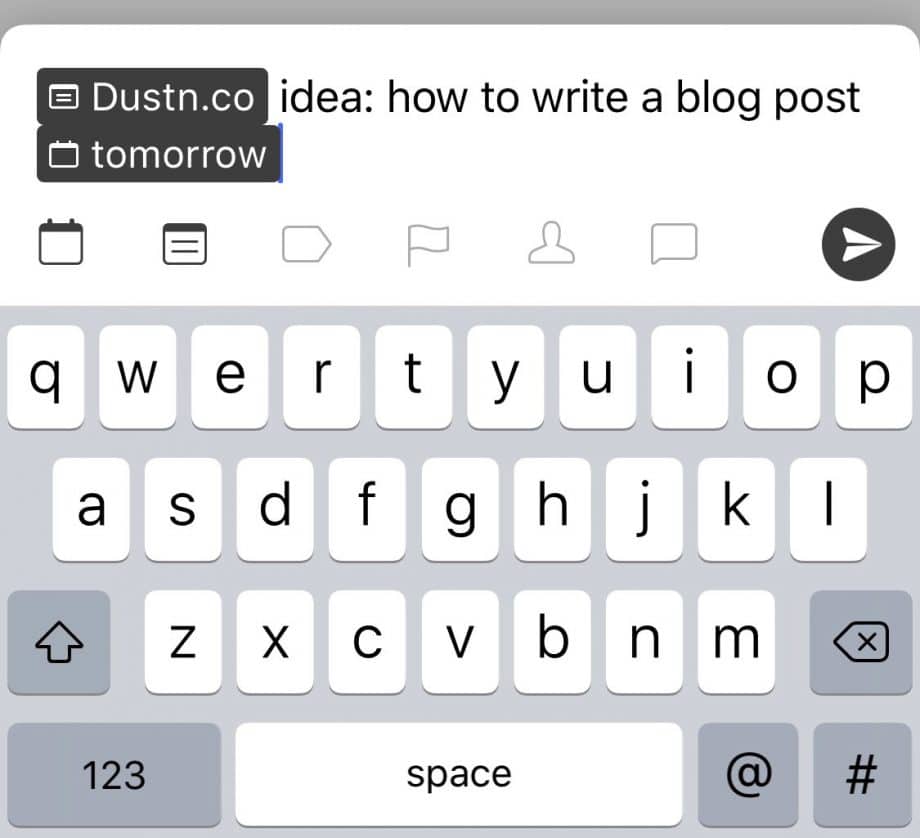
This means that Todoist will add a task titled “how to write a blog post” to my dustn.co project (the project I’ve associated with my blog) and give it a due date of tomorrow.

Todoist scheduled task for how to write a blog

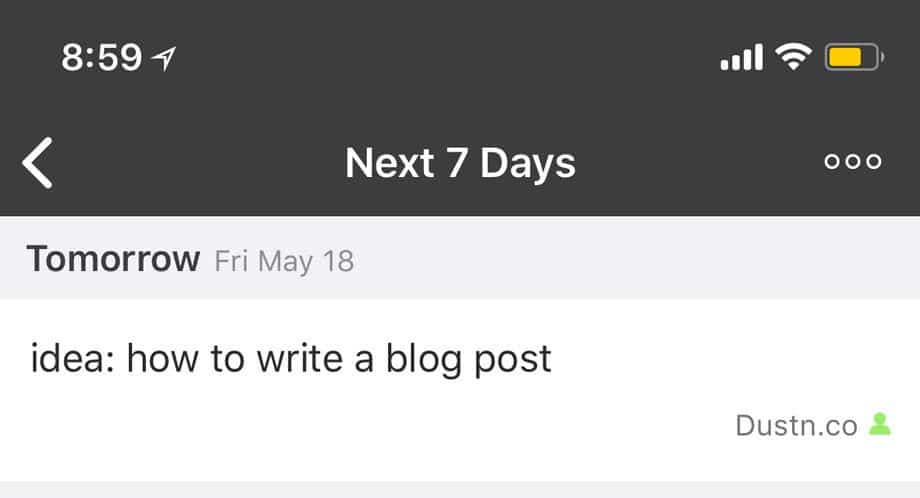
This ensures that I take action on every single idea I have, and it wont just be forgotten in some notebook somewhere.

If I need to add notes, details, or expand on the idea, Todoist allows me to do that by commenting on the task.

Since my day-to-day work pretty much revolves around Todoist and task/project management, this has been an incredibly effective method in capturing and taking action on my blog ideas.

My recommendation is— however you decide to capture your ideas, make it dead simple for yourself. It has to be quick, easily accessible, and memorable. Make it a habit.

Also, be sure to only use one system. Every idea gets captured in the same place. Having multiple places where you keep your ideas will just confuse you and make the job of bringing them to life harder.

One simple system is all you need.

Draft the Blog Post: Typora

screenshot of typora app with how to write a blog

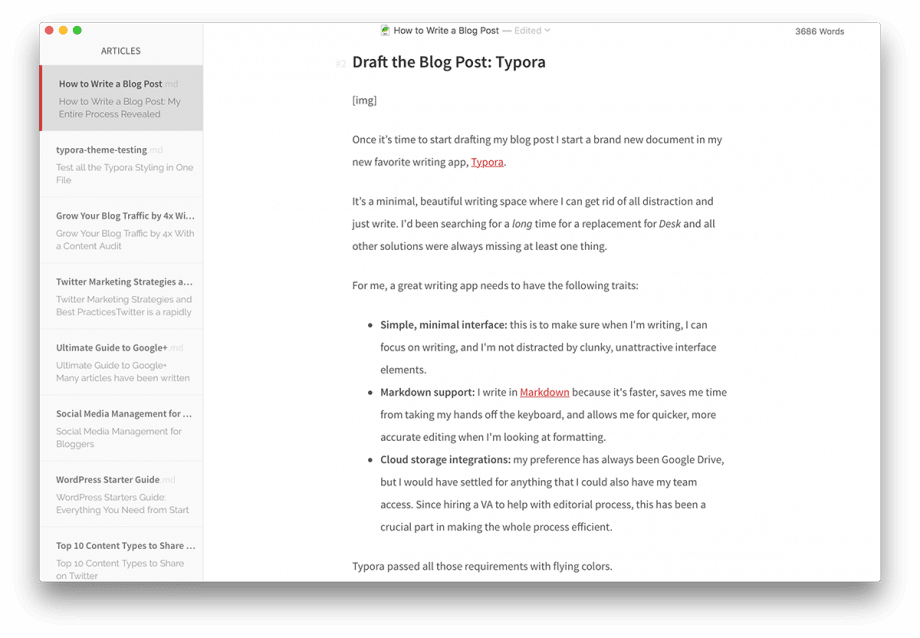
Once it’s time to start drafting my blog post I start a brand new document in my new favorite writing app, Typora.

It’s a minimal, beautiful writing space where I can get rid of all distraction and just write. I’d been searching for a long time for a replacement for Desk and all other solutions were always missing at least one thing.

For me, a great writing app needs to have the following traits:

  • Simple, minimal interface: this is to make sure when I’m writing, I can focus on writing, and I’m not distracted by clunky, unattractive interface elements.
  • Markdown support: I write in Markdown because it’s faster, saves me time from taking my hands off the keyboard, and allows me for quicker, more accurate editing when I’m looking at formatting.
  • Cloud storage integrations: my preference has always been Google Drive, but I would have settled for anything that I could also have my team access. Since hiring a VA to help with editorial process, this has been a crucial part in making the whole process efficient.

Typora passed all those requirements with flying colors.

The interface is simple, minimal, and gorgeous. It was also built specifically for writing in Markdown.

As a bonus, it’s also highly customizable with themes! I’ve built a custom Typora theme for myself that makes the writing experience all the more enjoyable. I finally love sitting down and just writing again.

And lastly, it utilizes files from your computer. Therefore, if you have a cloud service (such as Google Drive) syncing files on your computer, that’s all you need to always have access to your files in the cloud.

Oh, and one last bonus—it’s 100% free! Could this app get any better?

Okay, that’s the end of my sales pitch for Typora.

When it’s time to begin drafting a blog post, I will fully draft out the entire thing, starting with a sort-of bulleted list of items that I want to hit. Then I will go back and tackle one point at a time until the entire draft is written.

Every blog post I write generally has the following structure:

  • Lead: This is the opening sentence to the blog post. It’s crafted to put the reader in the exact frame of mind that I want them in when they begin reading.
  • Intro: This is where I introduce the problem I’m solving, a brief story of why I’m writing the article, or just a plain old intro to the subject matter.
  • Body: This is the meat and potatoes of my blog post.
  • Conclusion: Wrapping it all up and giving either a final note or a call to take action.
  • Question: I try to ask the reader a though-provoking or action-oriented question to spark conversation.

Sometimes the type of blog post I’m writing will deviate from this structure, but for the most part it’s pretty consistent.

Keyword Research: Two Options

Ahrefs and KWFinder screenshots for how to write a blog

Once I’ve got everything drafted out I’ll then take some time to go do some topic research, also known as keyword research.

This is probably backwards for some people who are super organized and do all their research ahead of time. That’s not how I operate.

I like to get all my own thoughts out first, exactly as I would explain it to the person it’s meant for before seeing how others may have approached the same topic.

I feel I learn more this way and instead of having my research dictate how/what I write, I can see how my own thought processes align with those of others.

If I find any relevant links or extras to add in based on the research, I go back and add them into the draft.

Tools I use:

Is Keyword Research Important?

Yes, it is. But, why? Let me give you an example.

A few months back I was writing an article as a follow-up to a content audit I did for my blog. I knew that this blog topic was of high interest as articles like it had performed very well in the past.

I had drafted out the entire blog post already, based on previous ones like it, and even created a boat-load of visual assets for it–an infographic and a handful of other sharable visual content—and it was almost ready to publish.

Since I already “knew” this subject was going to be successful, I didn’t think I needed to do any keyword research. I was convinced that “social media stats” was the keyword I needed to focus on.

However, my gut told me that I should trust my process, and do the keyword research anyways.

Holy crap was I glad I did.

The estimated search volume for the phrase “social media stats” was about 1,400. That means Ahrefs believes that there are about 1,400 searches per month for that specific phrase.

The estimated search volume for the longer “social media statistics” was about 5,400. So just by targeting the unabbreviated version of that word, I was opening myself up to 3,000 more searches per month.

That’s a big deal.

So, yes, keyword research, even just some simple keyword research, can go a long way.
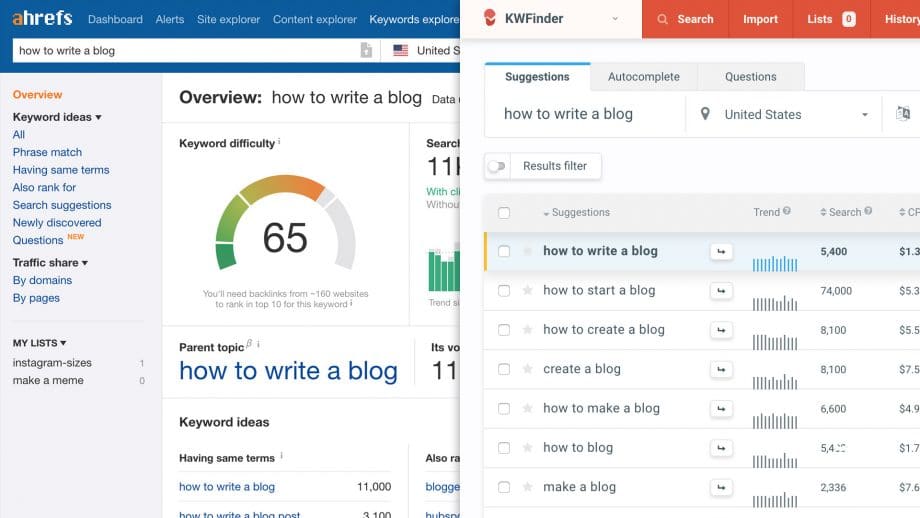
Using Ahrefs

screenshot of ahrefs keyword research for how to write a blog

Although it’s definitely not the low-cost option, I highly recommend using Ahrefs if you’re getting serious about your SEO. It’s the most powerful and easy-to-use SEO tool I’ve tried.

Doing keyword research with it is also pretty easy, and gives you loads of data.

ahrefs full page keyword research for how to write a blog

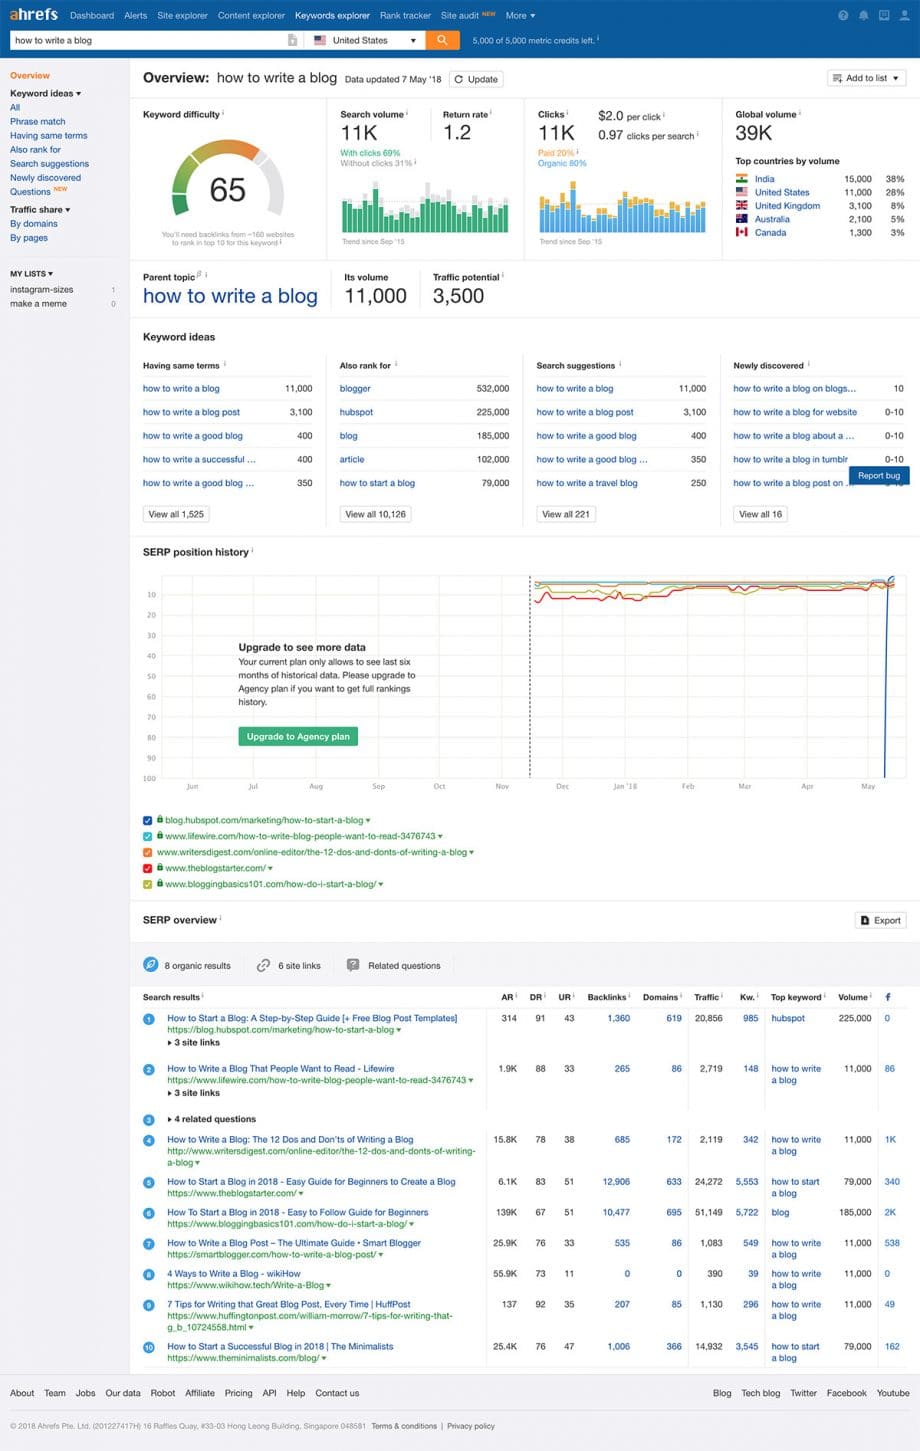
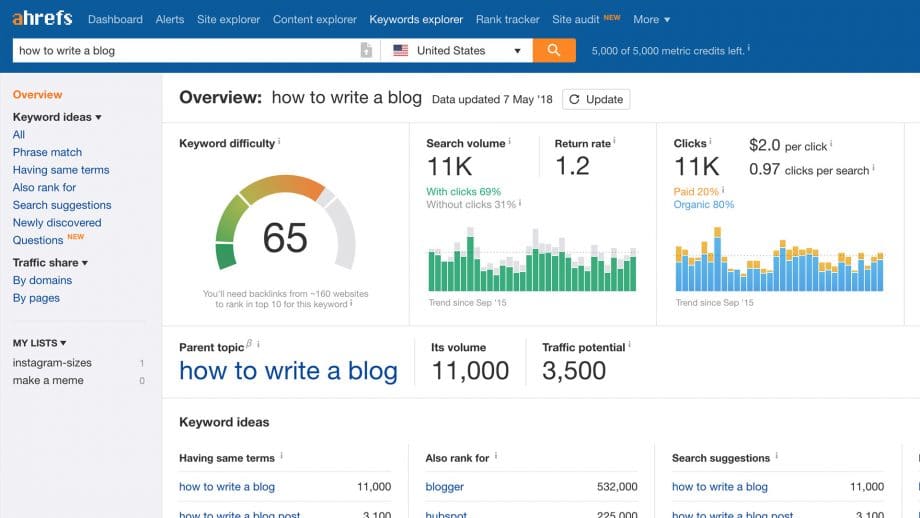
A simple search for your keyword will give you some very important information:

  • Keyword difficulty: this indicates how difficult it would be to rank first for that term, with a helpful estimate of how many backlinks you would need to rank top 10.
  • Search volume: if you want to get free traffic (and who doesn’t?) then you’ll want to know that the keywords you’re targeting have a good amount of people searching for them.
  • Parent topic: this shows you if there is a more broad topic/keyword that your chosen keyword falls under. You may even be able to leverage that parent topic to drive more traffic than the one you chose.
  • Keyword ideas: this will show you potential alternatives to the keyword you’ve chosen. I can’t tell you how many times I have looked at that list and changed my keyword because I found a more relevant term that would drive more organic search traffic.
  • Search results: this gives you a snapshot of the websites that are already ranking for this keyword so you can take a look at what is on those pages. You may even get some ideas to make your post better by reading those top-ranking pages.

And that’s only the tip of the iceburg for what Ahrefs is capable of.

Starting at $99/mo it’s certainly not a small investment. Especially for beginner bloggers who haven’t yet turned their blog into a profitable business. But the moment you have the extra time and resources to invest in your SEO, this is the tool to use.

Using KWFinder

KWFinder results for how to write a blog

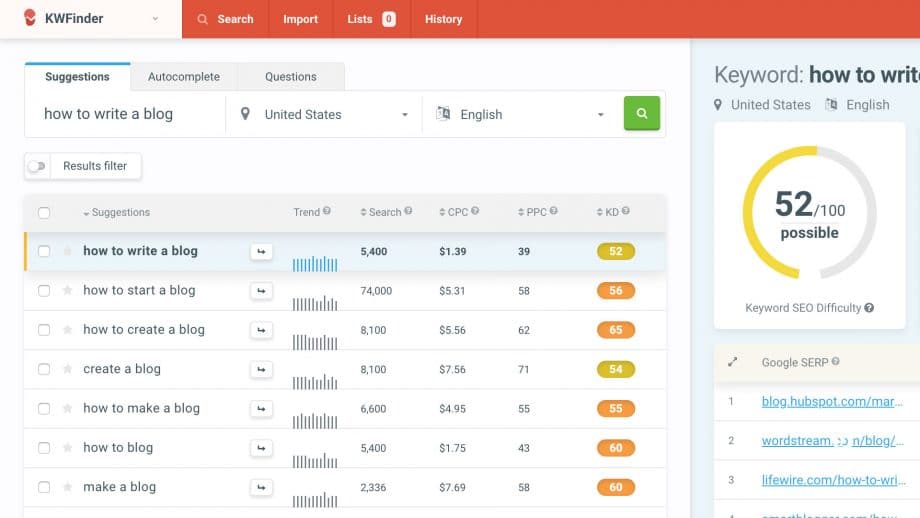
While not as comprehensive as Ahrefs, the free version of KWFinder will allow you to perform up to 5 different searches per 24hrs. This is probably enough for beginner bloggers.

When you type in your search term, you get some pretty helpful information:

  • Search volume: same as Ahrefs
  • Other suggested terms: in a scrollable list below where your keyword is listed
  • Keyword SEO Difficulty: very similar to Ahref’s Keyword Difficulty but with a diffferent rating system.
  • Google SERP listings: same as Ahrefs “search results” feature, showing you which pages are currently ranking for your selected term.

Being a free tool, you can’t help but love it. The interface is good, and it gives you all the most important info you need quickly and efficiently.

full page screenshot of KWFinder results for how to write a blog

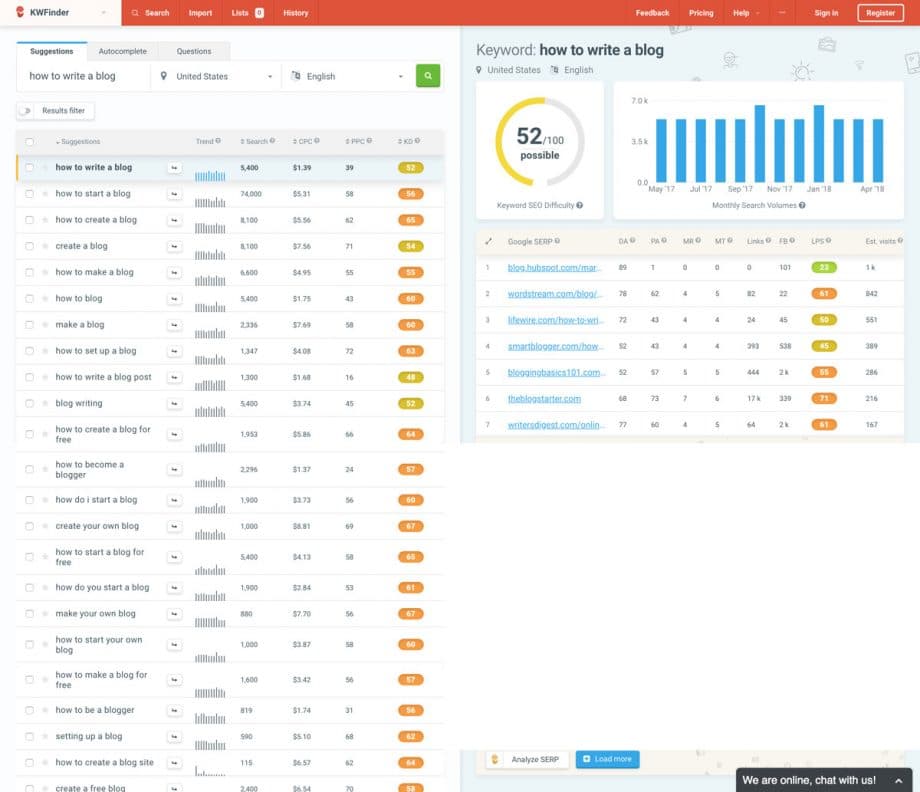
So if you’re on a budget, this is the keyword tool you’ll want to use. There are others, but none of them caught my eye quite like KWFinder.

As a bit of bonus reading, there’s a great article all about keyword research over at FirstSiteGuide you can check out.

Applying the Keyword Research

Once I’ve done the keyword research, it’s time to make sure the keyword I decided on appears in several places throughout the blog post:

  1. The title of the post
  2. The first paragraph of the post
  3. The last paragraph of the post
  4. 2-3 more times throughout the entire post
  5. The url (but I wont get to this until right before publishing the post in WordPress)

I try not to overdue it since I’m writing for people, not robots. So when placing keywords in the post, I make sure that it sounds natural and not forced.

Always write for real people.

Finish blog draft

Once keywords have been added in a natural way, I’ll go through my post one more time, reading slowly, looking ways I can:

  • Explain things better
  • Write simpler, more concisely
  • Add formatting such as bold, Italics, headings, etc.
  • Add placeholders for possible imagery

This is basically the step where I add polish to the words themselves, ensuring that my message is as good as it can be.

Also, I try to rope my wife in at this point and have her proofread it. She does have her Master’s Degree in communications studies, afterall. And she always finds ways to make me sound smarter. (That’s my secret, shhh!)

Next comes the most fun part for me, creating the images.

Create the Images

Photoshop image creation screenshot

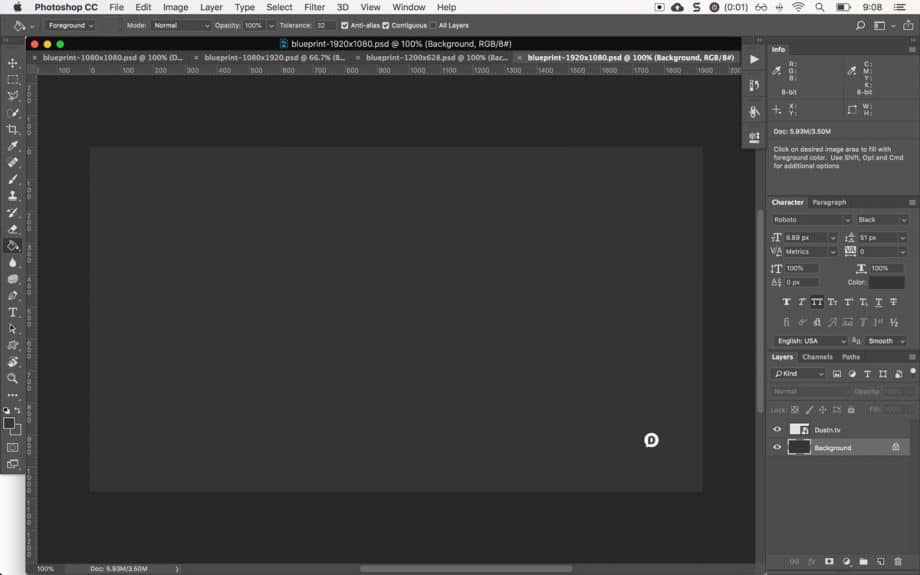
Once the blog draft is finalized, I then begin making all the images.

Usually I begin by creating the headline graphic (or hero image). This is the image that will show up as the featured image at the top of the blog post.

From that I create 3 different versions of it according to my social image templates that I’ve shared previously.

This generally takes me anywhere from 10-20 minutes to create all 4 images. (I teach about this in my course, Visual Content Mastery.)

If there are screenshots involved, I go grab them one by one. I will take the first screenshot and create a template for the rest of the screenshots, making sure that they will all end up being the same exact size (if possible).

attempt at funny

I also spend some time trying to find (or create) GIFs that help add a bit of moving color to the blog post when appropriate. You may notice that when I use GIFs they’re often times an attempt to add humor.

When I create my images (using Photoshop) I always save them in the most optimized format possible. This means that I use the “Save for Web and Devices” option and then tweak them down make sure the file size is as small as I can get it without losing image quality.

I’ve previously written extensively about optimizing images, if you want to dive deeper on that subject.

I save all images in a new folder named after the blog post topic.

JPEGmini screenshot

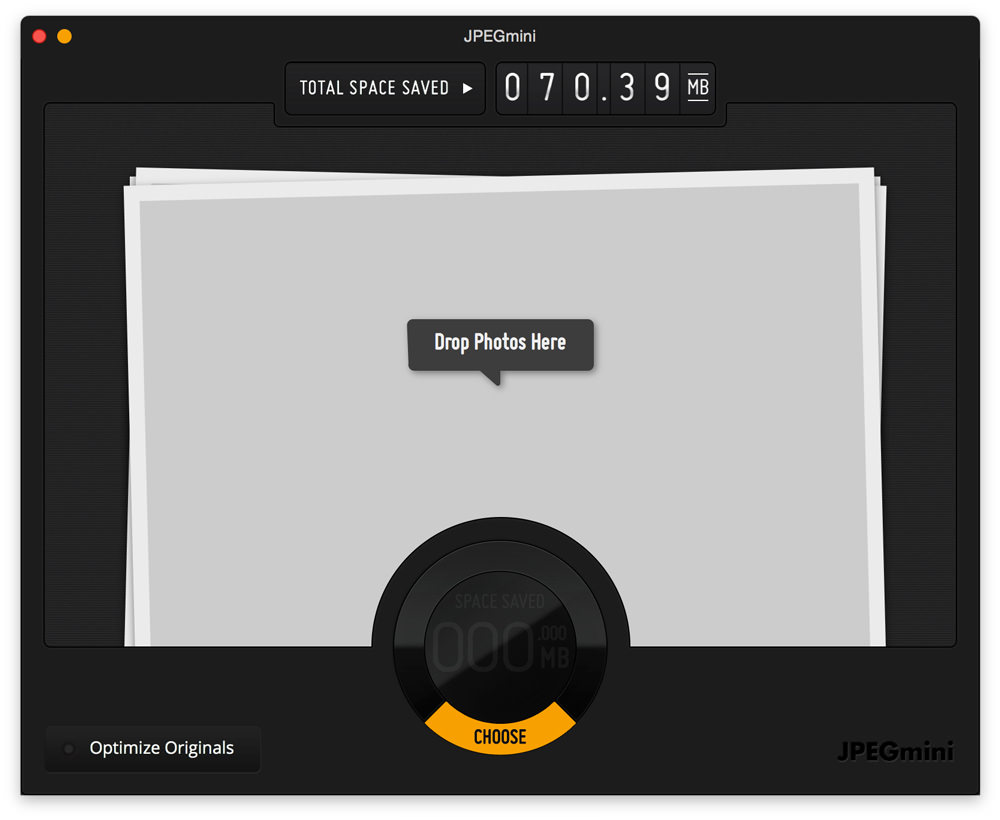
Once I’ve saved the images, I then pull all of them into JPEGmini Lite. It is a Mac App that further optimizes the images (JPEGs only) using what I can only imagine is magic, reducing the file size even further without image quality loss.

Put the Draft in WordPress

WordPress editor screenshot

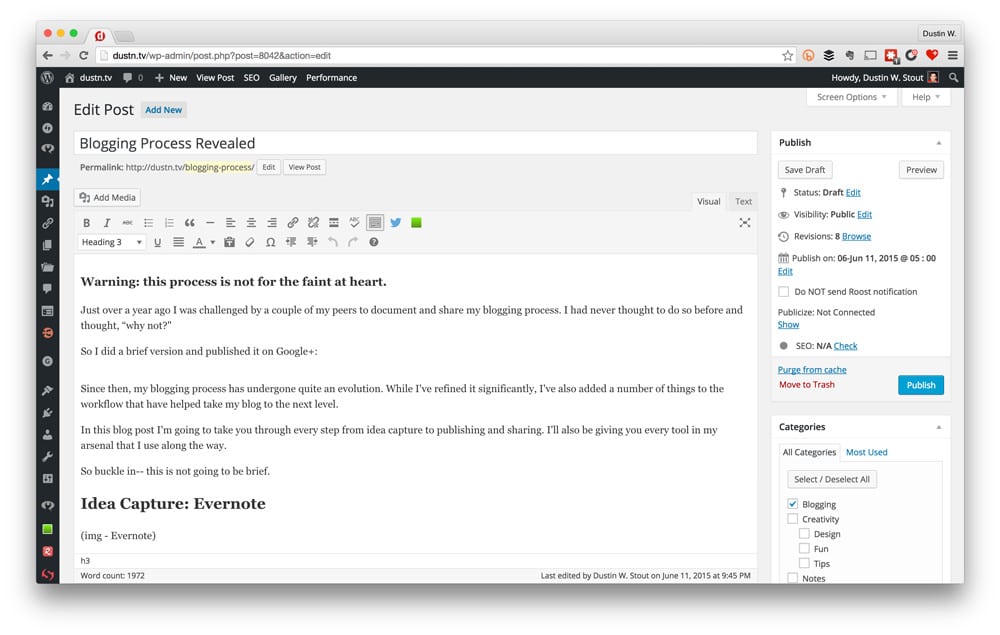
When all the images are created and optimized, it’s time to move the post into WordPress.

Now, since I use the Jetpack plugin, I could just copy and past the post into WordPress in Markdown format and it will be automatically converted to HTML on the front end.

However, since I sometimes use additional HTML elements and styling (such as buttons) within my post, I like everything to be clean HTML. Also, some day I might not use Jetpack anymore and don’t want to go back and have to re-edit every blog post.

So I first copy the entire draft and paste it into my code editor, Atom.

atom editor with how to write a blog post draft

Atom has a built in feature where you can copy your Markdown text as HTML. So once I’ve copied the HTML from Atom, I paste it right into WordPress (text mode).

WordPress blog post editor with arrow pointing at Text tab

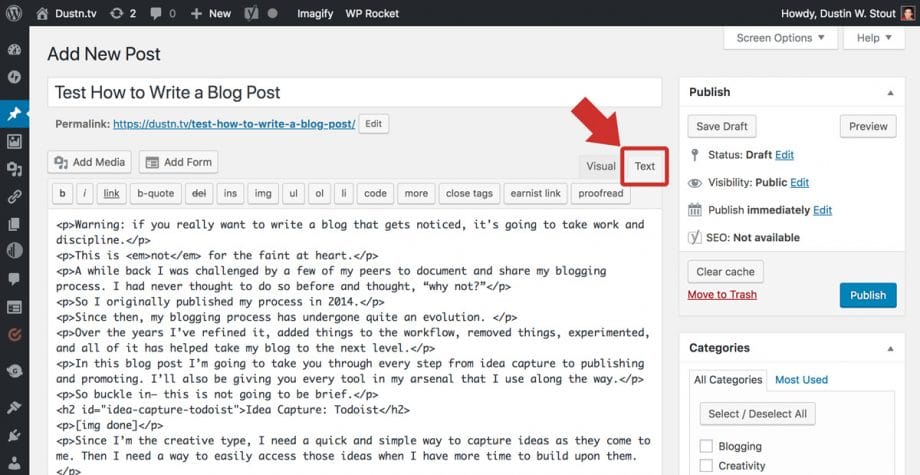
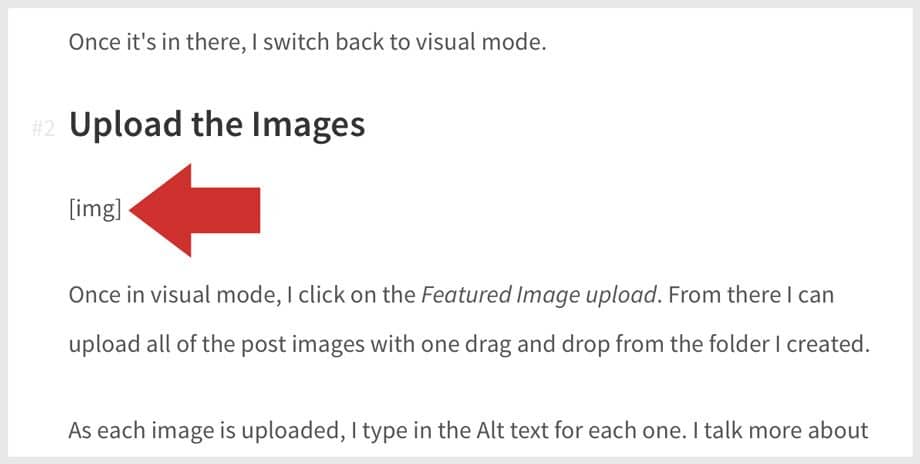
Once it’s in there, I switch back to visual mode.

Upload the Images

screenshot of WordPress featured image upload screen

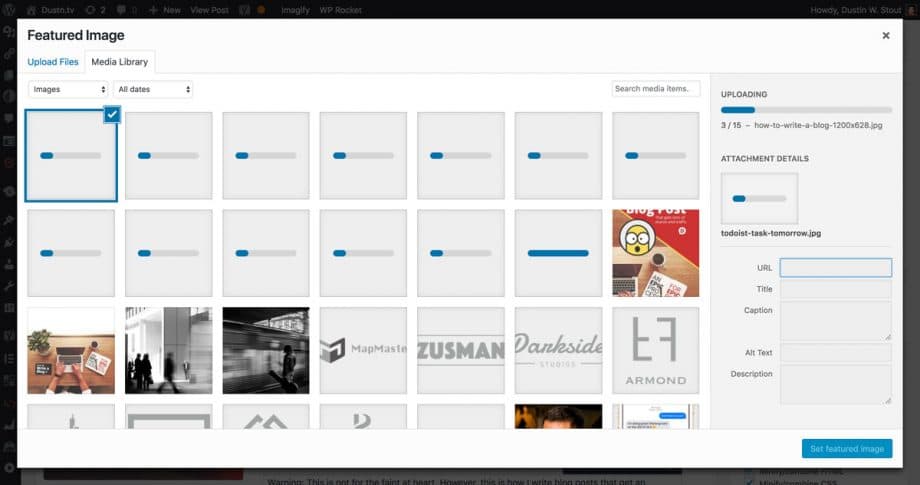
Once in visual mode, I click on the Featured Image upload. From there I can upload all of the post images with one drag and drop from the folder I created.

As each image is uploaded, I type in the Alt text for each one. I talk more about why Alt text is important in my previously mentioned image optimization post. It’s very important that you write your Alt text for each image.

Once they’ve all uploaded and have their Alt text, I select the Feature image and click Set featured image and start replacing all my image placeholders with the appropriate image throughout the blog post.

Example of image placeholder text

I have to admit, this part of the process is very satisfying. Having done all the other work ahead of time means I’m just scrolling for the image placeholders, and finding the appropriate one in the media library to insert it.

Analyze and Refine the Headline

CoSchedule Headline Analyzer

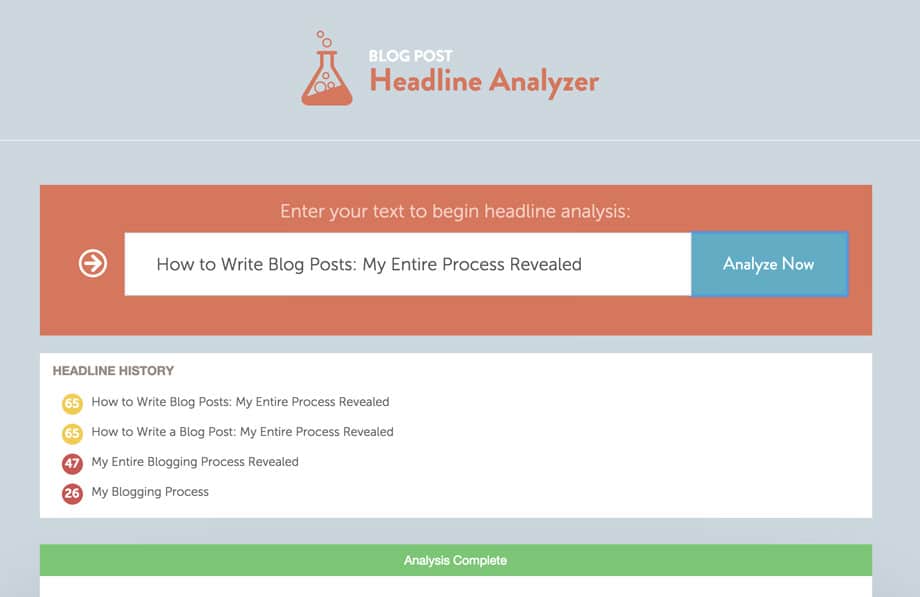
Once the blog post is finalized, now it’s time to ensure that the headline is as good as it possibly can be.

Most people will judge whether or not your blog post is worth reading just based on that one element alone. So it must be good.

To make sure I’m using the best headline possible, I use CoSchedule’s Headline Analyzer.

Simply enter your headline and it will score it based on a number of different factors. It will break down all those factors for you and give you a score (0-100) as well as a grade on word balance. There are a total of 11 different factors to help you craft the perfect headline.

I won’t use a headline that gets a score less than 60, unless I have a strong gut feeling that it will work.

Side note: If you aren’t using CoSchedule yet, I’m guessing you have yet to put together an editorial calendar strategy. I highly recommend you do.

Optimize for Social Sharing

At this point, the blog post is done. Now it’s time to prep this baby for what happens after it’s published, starting with the social shares.

Custom Sharing Options from Social Warfare

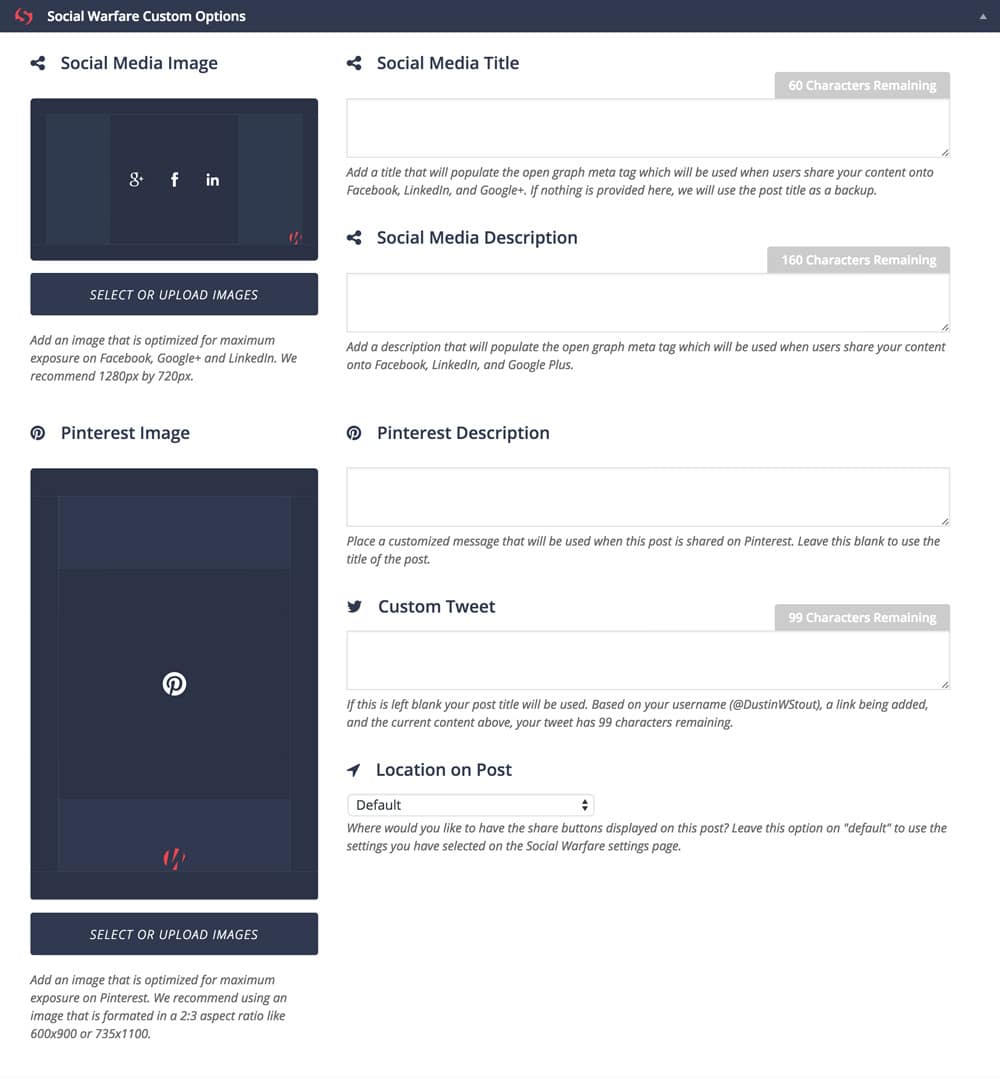
Thanks to Social Warfare, this workflow is very easy. I start by selecting the social media images— the general social media image and the Pinterest optimized image. Then I fill in the title, description and tweet inputs.

This is highly important to me because I know that the most important part of extending my reach is other people sharing the post. When other people share it I want to make sure I make it super easy for them to share the article in a way that attracts click-throughs and more shares.

If you do this part right, you don’t even need to know how to use Twitter and you can be successful on it.

As we like to say at Warfare Plugins, “get your posts shared the way you want them to be shared.”

Schedule Social Shares

CoSchedule share schedule screenshot

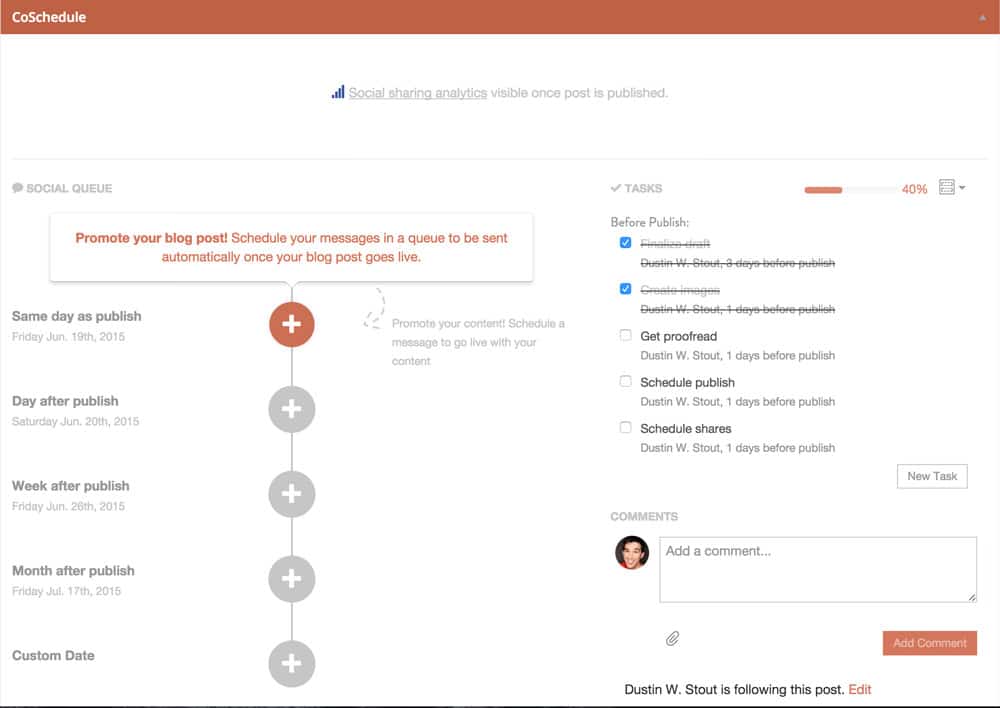
Thanks to CoSchedule, I can schedule my own social shares of the post before it’s even published.

And I’m not just talking about sharing the post as soon as it’s published. I’ve created a 5-minute system that allows me to create 30-days worth of social promotion. This is by utilizing CoSchedule’s Social Templates.

Using these Social Templates I schdule an entire months worth of blog post promotion for my:

  • Google+ Page
  • Twitter account
  • Facebook profile
  • Facebook page
  • Pinterest account
  • LinkedIn profile

Those reshares usually account for 50-70% of the total clicks and traffic to that blog post in its first 30 days. Definitely worth the effort.

But I’m not just sharing a headline and a link—each post is crafted specifically for the platform it’s being promoted on.

And if this blog post is truly an evergreen post then I take an additional step of adding it to my Agorapulse evergreen list so that it will be shared out on a regular basis indefinitely.

That might seem like a lot to some people, but I’m not sharing the post every day. Agorapulse intelligently shares out my library of evergreen posts on a specific, and conservative schedule, making sure nothing is repeated too frequently.

Publish & Share

Now it’s time to hit that beautiful blue button. The moment where I release my work into the wild. After hours of laborious writing, editing, visualizing and more editing, it’s finally time to hit Publish.

To this day I still get a rush of excitement when I hit that button.

excited dr. evil

But once it’s published, I head over to the live version to give it one final look, just to make sure nothing is wonky or out of place.

Once that’s done, I take a breath and maybe have a drink.

Conclusion

This process is definitely not for the faint at heart. But this is how I craft blog posts that get (on average) 500+ shares with the occasional 1k+ share post.

To me, blogging is an art form. And while I’m continually working to shave off time and make this process more efficient, sometimes you just need to take the time to create something that you’re darned proud of.

My hat is off to bloggers who can just sit down, crank it out in under an hour and be done with it. For me– this process works.

And the fact that my posts continue to improve my search engine ranking, and continue to get social shares years after they were first created confirms it’s working.

It’s one thing to just know how to write a blog. It’s another thing entirely to write a blog post that gets shared, and drives tons of traffic for years to come.

Is your blogging process anywhere near this extensive? Or am I just a little insane for being so detailed? You can leave a comment by clicking here.

Featured image courtesy of Jacob Lund via Shutterstock.

Dustin W. Stout Avatar

102 responses to “How to Write a Blog Post: An Epic Process for Epic Results”

  1. Gautami Tadimalla Avatar

    Very Nice!! Thanks for Sharing..

  2. Felize Blog Avatar

    A great roundup with some pretty amazing advice.

  3. Brandon Baker Avatar
    Brandon Baker

    Great share, Dustin. Your writing process seems so smooth and organized. I usually don’t follow any process and find it hard to write, create images, or publish the article. Often time I’ll just leave an article in middle to do something else.

    Thanks for sharing the step-by-step guide. I’ll be sure to follow it and see how it improves me.

    Keep growing 🙂

  4. Dustin W. Stout Avatar

    I’ve tried several times now and writeapp.co’s website won’t seem to load. Is it still supported?

    And thanks for you support, Panos!

  5. Panos Avatar

    I always enjoy your articles and I find them really helpful and informative. I didn’t knew about Typora, I’ll give a try. But the best writing tool for me is writeapp.co, and it also let me publish my articles in WordPress without even visiting WordPress. I’m also using Trello to organize my ideas and Social Warfare to promote my posts (see what I did there? ?).

  6. WeirdnLiberated Avatar

    Thanks for the tips, got something to keep in mind for my blog posts.

  7. Dustin W. Stout Avatar

    Thank you, Verma!

  8. Verma Avatar
    Verma

    Great and an informative article!

  9. Dustin W. Stout Avatar

    You’re welcome, Atma!

  10. Atma Varta Avatar
    Atma Varta

    Thank you so much for such an amazing post. Will definatelly follow this while blogging.

  11. Dustin W. Stout Avatar

    You’re welcome!

  12. Reuel Avatar
    Reuel

    This post is gold thanks all for sharing

  13. Dustin W. Stout Avatar

    You’re very welcome, Jamie!

  14. Jamie Ross Avatar
    Jamie Ross

    Dustin, this is a killer article and priceless resource! I wrote a blog post following your steps and I really like it. I’ve never used Atom – I use Sublime Text, but I don’t have it configured for markdown, so I may give Atom a try. Well done, thank you!

  15. Train to Titel Avatar

    This is very long blog post. But, I agree with much of that. So, I need to change so much things, to bring much more people to my blog. Thanks for great explanation.

  16. Dustin W. Stout Avatar

    Awesome, Penelope! Thanks for reading, and cheers on the new notebook! I’ll actually be updating the post soon as I no longer use Evernote. I wish I could, but the lack of Markdown support and their rich text formatting had become too problematic for me.

  17. Penelope Silvers Avatar

    Yep, your process sounds pretty similar to mine–minus a few things here and there. It definitely is a time-consuming process, but the more time you put into it, the better and more shareable the post. I clipped your article into Evernote, along with adding in the new BLOG POST IDEAS notebook.

    Thanks for sharing!

  18. Dustin W. Stout Avatar

    Thanks David. I feel the same way–new perspectives and seeing how other people do things always keeps me growing. I do need to update this post too. About 90% of it is still the same, but a few things have changed.

  19. David Donahue Avatar

    Great post! I have learned so much in the past couple years from the learning platform I use but also from bloggers like you that post articles. What is interesting to me is I think I got things figured out then someone blogs something that gives me a new perspective on how I can better my blog. This post was refreshing even though it’s a couple years old!

  20. Dustin W. Stout Avatar

    You’re very welcome Oby!

  21. Oby Avatar
    Oby

    By far, one of the best articles on writing a blog post I have ever read. You’re right Dustin. It is not for the faint heart, but it will be worth it if I could follow this process. Thanks for sharing. I am definitely returning to your blog.

  22. Tami Qualls Avatar

    Yes, please do!

  23. Dustin W. Stout Avatar

    Awesome Virginia! And yes, CoSchedule’s headline analyzer has been a game-changer for me too!

  24. Virginia Nakitari Avatar

    Wow! This is amazing. I have been procrastinating lately while writing my posts. Time to implement your strategy. It’s well thought out and very thorough. I love CoSchedule. It makes choosing my blog post titles very easy.

  25. Dustin W. Stout Avatar

    Thanks Amanda! Glad you found the post useful. I’m thinking about creating a sort-of “checklist” for this post when I update it soon. Would you think that is helpful as well?

  26. Amanda @ AJ Money Matters Avatar
    Amanda @ AJ Money Matters

    Dustin, I think this has to be one of the most helpful posts I’ve read on this topic! You’ve made it look really simple and easy to follow. We’ve been looking at Social Welfare for a while, so I think it’s time to look into it 🙂
    Amanda

  27. Dustin W. Stout Avatar

    Congratulations Marsha! My best answer to that question is: grow your audience before worrying about how/when to do affiliate ads. In order to make anything significant from affiliate ads anyways, you need a large audience.

  28. Marsha Leyva Avatar
    Marsha Leyva

    Hi Dustin. I want to start my own blog so I’m researching everything I can on the subject. I really enjoyed your blog on this subject. Makes more sense to me than some of the other how-to blogs. My question is how and when are affiliate ads added?

  29. Dustin W. Stout Avatar

    You’re very welcome Brandon!

  30. Brandon Queen Avatar
    Brandon Queen

    Thanks for your time and input on blogging! Very helpful!!!

  31. Dustin W. Stout Avatar

    You’re very welcome!

  32. DanDan Avatar
    DanDan

    Hi there,
    Can’t tell you how much I appreciate the detail you’ve gone into to share your process. Being creative can be a lonely business….lots going on in the mind! It’s nice to see it broken down.

    Thanks

  33. Dustin W. Stout Avatar

    Awesome Patty! Optimizing for each platform is a must for me. I know that if I want to make that share worth anything, it has to speak to that audience.

  34. Patty Avatar
    Patty

    Good to know my process isn’t out of the ordinary! I thought for a while I was doing too much but it looks like I’m on track. Definitely need to optimize more for each social media platform.

  35. Dustin W. Stout Avatar

    Thanks Nirodha! I’ve heard many great things about Scrivener.

  36. Nirodha Abayalath Avatar

    Hi Dustin,

    I love reading this as your previous articles. I learned a lot from this alone as a beginner.
    Thanks for that.
    And, I’m using Scrivener for my writing.
    Keep doing this good work.

  37. Dustin W. Stout Avatar

    Thanks so much Sam! Hope it made your brain smile. 😀

  38. Dustin W. Stout Avatar

    I’m so glad you found it useful Lydia! I’m thinking about making a downloadable checklist for this. Good idea?

  39. Sam Avatar
    Sam

    Super helpful!!!! I am still getting my blog together to publish, but I really need some tips pertaining to blog content and you answered every question I could have asked. Very entertaining as well 🙂

  40. Lydia Brown Avatar

    Hey Dustin heck yeah your process is extensive! I can tell you I wrote down every step and will do my best to complete each one accordingly. Can’t wait to see how I do. It is all about time which I have and patience which I need but I love results the kind you get. Thanks for sharing.

  41. Dustin W. Stout Avatar

    Hey Jonathan! Glad you enjoyed the post. What makes you think Desk doesn’t work anymore? John is working on version 3.0 currently and it’s been working great for me.

  42. Jonathan Avatar

    Thank you for the very in detail process! I like that you’ve turned creating content into an art form and also love your clear plan for putting out the best information you possibly can. Learned a lot and made quite a few notes of your process. Going to implement some of the things you mentioned. Too bad DESK doesn’t work anymore; any replacement ideas?

  43. Dustin W. Stout Avatar

    Both Facebook and LinkedIn groups are great places to promote your content if (and only if) you’ve spent the time to engage with and understand the culture of each group. I’ve never put the time in with many of the Facebook groups I’m a part of and haven’t really spent any time in LinkedIn groups. So, for those reasons, they’re not a part of my workflow. I can say with 100% certainty though (because of friends who utilize them) that they can be a very successful promotion channels if done right.

  44. Derric Haynie Avatar

    The only thing I would add is promoting on Facebook and Linkedin groups as well. Obviously this post isn’t focused on the promotion, but just to be thorough. I get a lot of initial traffic by posting to 20+ groups that are centered around sharing content (don’t just spam any ole fb group, you have to find the right ones).

  45. Dustin W. Stout Avatar

    Glad you liked it Menellia! 😀

  46. Menellia Avatar

    Very strategic and well layed out. I have taken notes. Thanks for this.

  47. Dustin W. Stout Avatar

    Awesome Aida! Best of luck!

  48. Aida Avatar
    Aida

    You know what Dustin? This is absolutely mind blowing and what I want to find in blogging..Thanks for ure behind the scene from begining till end for posting. Tqvm..☺

    *inspired me to blogging – happy 2 days in blogging area (to me)

  49. DEBASISH SUARO Avatar
    DEBASISH SUARO

    Great inside view of the total process of writing a good price of blog…. Like you said it’s an art form and when you have invested so much time and effort into this the result will always be beautiful when all the pieces come together and complete the master piece.

    I am new to blogging and all the ideas you shared is of utmost help . Thanks !

  50. Dustin W. Stout Avatar

    Thanks for reading Julie! Glad I could help!

  51. Julie Avatar
    Julie

    Really helpful Dustin – and much what I suspected. Time, effort and energy is needed. Writing itself is indeed just one aspect. I appreciate sharing the knowledge the way you have and I look forward to starting out.

  52. Dustin W. Stout Avatar

    Thanks Andre! I appreciate you taking the time to comment and share! 😀

  53. Andre Avatar

    You have an excellent process Dustin. I just bookmarked and shared it because I will definitely come back to it for future reference for certain! Thanks!

  54. Dylan Robertson Avatar
    Dylan Robertson

    Yeah, I hear you. The site was obviously designed by a well-meaning engineer… hehe… But, that’s the case with a lot of open source software, I think – great technically, but poor marketing.

    I’ve done some hunting around and read some reviews and comparisons. It seems to be very competitive in terms of performance. I’m using it now and it’s working nice on my PNGs.

    So, I got a refund from JPEGmini, but I’ll keep it around as a backup in case.

  55. Dustin W. Stout Avatar

    Honestly, I haven’t tried ImageOptim. Sites that look like that don’t give me a lot of confidence and if I can’t find it in the Mac App Store, I am very skeptical of trusting a Mac App.

  56. Dustin W. Stout Avatar

    My pleasure, Dylan.

    I don’t actually use anything to compress PNGs. Since I use Photoshop for creating PNGs I save them in a way that optimizes them already and any further optimization (if possible) would be minuscule at best.

  57. Dylan Robertson Avatar
    Dylan Robertson

    Dustin, sorry, one more thing… Any thoughts on ImageOptim? It’s free and seems to do everything JPEGmini does. Wondering if I did the wrong thing just buying JPEGmini (although it is awesome).

  58. Dylan Robertson Avatar
    Dylan Robertson

    Dustin, really appreciate this amazing resource you provide and your willingness to answer questions.

    What do you use for compressing PNGs? Is there something similar to JPEGmini?

    I tried TinyPNG, and it’s awesome, but not as convenient to use as JPEGmini…

  59. Dustin W. Stout Avatar

    I’ve never used the paid Kracken.io service, but JPEGmini has always worked perfectly for me.

  60. Dustin W. Stout Avatar

    Since Desk is a Mac app and Grammarly is a web app, you would need to copy/paste from one to the other. A bit clunky, but worth it if you’re a notorious typo-ist like me. lol

  61. Dustin W. Stout Avatar

    You’re welcome Shatece!

  62. Dylan Robertson Avatar
    Dylan Robertson

    I was using Kraken.io, which is a superb service, for optimizing images, but decided to go for JPEGmini to save cost for the time being.

    After they are optimized, I upload them. If they are over 2048×2048 pixels in size, they are automatically resized by the Imsanity plugin.

    I think I’ll come back to Kraken in the future once I have a situation with multiple people working on content on a site.

  63. Dylan Robertson Avatar
    Dylan Robertson

    I wrote a huge writing and editing manual for myself, but it is so unwieldy that I never look at it. Much better to have something like what you have presented in this post. I shall adapt for my own uses. For me, Grammarly has become indispensable. My writing would be a mess without it. I wonder if Desk would work with it. Desk certainly looks awesome.

  64. Shatece Haynes Avatar

    For the most part, I’m pretty new to blogging and I found this article to be incredibly insightful. Thank you so much for the awesome post!

  65. Les Avatar
    Les

    I was able to catch a glimpse of that somewhere in your post after I asked the question. Thanks again for a great post.

  66. Dustin W. Stout Avatar

    By “image placeholders” I literally just put (img – [idea for image goes here]).

  67. Les Dossey Avatar
    Les Dossey

    Fantastic post Dustin. I’m curious how you insert image placeholders.

    Are you doing it within desk or after you publish the draft to wordpress?
    Are you using placehold.it or another service?

    Could you layout the steps you take to expedite the process?

    Thanks for everything.

  68. Dustin W. Stout Avatar

    Haha! Thanks for the kind words Kelli! Hope you find some more useful stuff on here. 😀

  69. Kelli Claypool Avatar
    Kelli Claypool

    WOW Dustin…I absolutely LOVE this!! As a systems & processes kinda girl, I’m geeked over how you outlined your steps and used tools to craft the perfect post. YAY for you!!

    I cannot wait to read, and learn from, every one of your posts. Better make a new pot of coffee…looks like I’ll be here for a while! 🙂

    Thank YOU for sharing!!

  70. Crystal Avatar

    wow! Great post! I am going to look into your strategy and see if it’ll work for me. Thanks for sharing!

  71. Dustin W. Stout Avatar

    Thanks for the compliments! Yes, you can share drafts from Desk– there is an “Email” option. I’ve been waiting for almost 3 weeks for the new Desk 2.0 to drop… it’s going to be epic! If you haven’t bought it yet, you may want to wait because when 2.0 drops John (the developer) is releasing 2 other apps that you might want to consider as well.

  72. Dustin W. Stout Avatar

    Thank you Priyanka! I had never thought about using Trello to stay organized. That would be interesting to read about. We use it for Warfare Plugins to keep track of our “wish list” of features and add-ons for the future. Curious to see how you use it for blog posts though!

  73. Fuse Avatar
    Fuse

    Dustin this is the best blog post I have ever read on blogging workflow ever. Thank you so much. I fo similiar things but learned alot. Will try that desk app sounds fabulous, can you share drafts there with a proof reader? Right now i fo drafts on Google docs and send it to my proof editor

  74. Priyanka Avatar
    Priyanka

    Hi Dustin!

    Loved reading your post! To me, blogging is an extensive process as well. Which is why I also churn out posts once every 2 weeks. And I use Trello to stay organized. Right now I use Google Drive (Docs) to create drafts of my posts but Desk looks nice! I think I will give it a try!

  75. Dustin W. Stout Avatar

    Yep, headlines are a big deal which is why I take the time to craft them as best as I can. Thanks for adding to the conversation Abrar!

  76. Abrar Mohi Avatar

    Hi Dustin,

    Well, excellent article! I have been doing researches on titles how to increase clicks on them and interest more people to read the post thoroughly. I found one important quality what influences this is EMV (Emotional Marketing Value).

    I tested it myself and of course through CoSchedule that higher emotional value in title tends to convince more clicks, more reads and more shares. That has to be reasonable though.

    – Abrar

  77. Harinder Paul Avatar
    Harinder Paul

    Really Awesome Timeline of Sharing. Getting things Done Automatically is What the Best. We don’t have to waste time on sharing. Instead I can Enjoy My Coffee! Watching my Game Of Throne Episode! 🙂

  78. Dustin W. Stout Avatar

    Haha! I keep imagining you saying, “My, what big INPUTS, you have…” And yes, I do love my inputs– big, bold, just dying to be filled in. 😉

    Please borrow the idea– pretty please! I love hearing how different bloggers have different workflows and methods.

    And yes, Evernote is awesome. Couldn’t live without it.

  79. Brent Jones Avatar
    Brent Jones

    Dustin!

    First off, you have the largest input boxes of any comment section on any blog I have ever seen! (And they are beautiful…!)

    Second, may I borrow this idea? To create a post on my process? Although I don’t have nearly the following that you do, I think it is a great topic for generating dialogue / comments with readers.

    Third, I keep hearing about Evernote. I think I have to check it out now!

    Great post, my friend. 🙂

    – Brent

  80. Dustin W. Stout Avatar

    Glad you liked it Melissa! Cool to hear that you do your images first– I’ve done that a few times when a post has been inspired by a quote.

    And I didn’t realize JPEGmini was now for PC as well! Cool!

  81. Greg Savage Avatar
    Greg Savage

    Very interesting, thanks for the information.

  82. Melissa Avatar

    I love reading details like this!

    I too have a similar process with a few variations such as:

    Trello is my homeboy for stashing ideas/workflow/checklists etc.

    And every post starts with a hero image (because my content is mostly DIY/gardens and Pinterest is my BFF). I write the post once I have the visuals ready.

    Hey, I went to look at JPEGmini and they do also have a Windows version in addition to MAC in case anyone is interested.

    Thanks, I really enjoyed the post.

  83. Dustin W. Stout Avatar

    Yea, you’d think PS would be sufficient, but after optimizing in PS when I put them through JPEGmini I usually get 200-300% extra compression without quality loss.

  84. Dustin W. Stout Avatar

    I’m so glad you found it helpful Hema! And yes, I tend to look for a method to everything lol! The only way to ensure measurable results is to be consistent. Methodology allows for consistency. Once you see the results of the method you can tweak and refine. I never get too attached to a specific methodology, I just look for the results. So find a method that works for you and how you’re built– that’s where you’ll get the best results. 😀

  85. Greg Savage Avatar
    Greg Savage

    Hi Dustin,

    great post as usual, but what is Jpeg Mini doing that we can’t do in photoshop when it comes to squashing size while keeping quality?

    I figure a high-end app like PS should be able to do this no problem

    – Greg Savage

  86. Hema Avatar
    Hema

    Wow Dustin,

    Loved this post. Thank you for elaborating on every single step. You are so methodical and organized. I take a similar approach but still so much more to work on. Thank you for mentioning headline analyzer. Never heard of it before. Have just bookmarked this post for future reference. Awesome post. Thank you

  87. Dustin W. Stout Avatar

    Thanks so much for adding that to the conversation Debi! That IS an important part of the equation.

    And I may just need to use that little tidbit about my image sizes as a testimonial on my next webinar. (As long as you don’t mind of course.) 😀

  88. Debi @ DebiStangeland.com Avatar

    Surprisingly, my process is very similar to yours, Dustin. I think one important factor to point out is that you have to do this consistently over an extended period of time.

    Doing this once or twice will not get the shares and reshares you have shown. Doing this over and over and over again will begin to build those numbers.

    It will also begin to show you where reader engagement is strongest. This in turn will show you where to spend extra time ie. G+, Pinterest, Twitter, etc.

    Thank you for sharing your process with us. It’s very kind of you to share and encouraging to see I’m on the right track.

    For the record, your image sizes for social shares have done more to streamline my posting process than anything else this year. Thank you.

  89. Dustin W. Stout Avatar

    Haha! Awesome Rob! And please steal whatever you think will work for you! 😀

  90. Dustin W. Stout Avatar

    You got that right Susanna. Anyone saying it only takes 15min to be successful is selling snake oil. lol

  91. Susanna Perkins Avatar

    Thanks, Dustin. A really nice antidote to the “how to write a killer blog post that will generate tons of traffic in 10 minutes” variety of so-called advice that’s so prevalent today.

    It takes time and thought to craft a quality post and share it at the right times with the right audience.

  92. Rob Russo Avatar

    Excellent process, Dustin. And truly I appreciate the behind-the-scenes look at all your steps, seeing everything come together.

    As others of noted, I love that you write before you research. Really get your opinion out there first…

    Anyways, I will probably steal a few of these steps. (This is perfect timing as I just launched my new blog.)

    Now I’ve got to go… I have some serious writing to do!

  93. Mitch Mitchell Avatar

    No, I hadn’t seen either of these posts. I’m good with Compfight but it can’t do anything but help to figure out Google Plus better. Thanks!

  94. Dustin W. Stout Avatar

    Awesome Mitch! Have you seen my post about the The Best Places to Find Free Images? I mention Compfight in it and 16 others that have been super helpful.

    You might also like my Anatomy of a Perfect Google+ Post which makes it so that your first post is so affective you may not need to post multiple times.

  95. Mitch Mitchell Avatar

    That’s a pretty intriguing process. Very good detail you gave and there’s nothing I can argue with that you’ve shared here; good job.

    For me, the process for the most part is simpler. Most of the time my posts are streams of consciousness; I have an idea, I write about that idea, and I’m done.

    When I’m putting together any type of list post, I’ll take the time to actually create the list ahead of time but it doesn’t usually take a lot of time. Once again, I write the post until I’ve finished.

    I either use my own images (I take a lot of pictures) or a plugin called Compfight, which searches Flickr for CC images you can use on your blog.

    I use Twitterfeed to post all my blogs to Twitter. I somehow hooked my business blog up to LinkedIn a long time ago, and just recently hooked up a second blog to have its new posts go there.

    For Facebook and G+… totally manual process, and I fail there often because I forget to put stuff there many times. I’ll have to work on that. 🙂

  96. Dustin W. Stout Avatar

    One reason most people don’t draft in the WordPress editor is because if you lose your internet connection, you can potentially lose everything you’ve written. These day’s WordPress has gotten pretty good at auto-saves and it isn’t as big a problem. Still though– it’s an unnecessary risk for me. On top of that, it’s just not an aesthetically pleasing writing environment. Too many distractions for me.

  97. Nora Conrad Avatar

    I love reading posts like this, showing someone’s process. I actually have a pretty similar process, but I almost always draft my posts in the actual site editor. Is there a reason people don’t do that? I haven’t figured it out.

  98. Chris Wilson Avatar
    Chris Wilson

    I’d second that Dustin, I’d love to hear John’s pre/post Desk blogging workflow. Especially as you made the tool.

  99. Dustin W. Stout Avatar

    And thank you for comment Ahmad! I tried doing research the other way around and it just didn’t work for me.

  100. Dustin W. Stout Avatar

    Thanks John! I’m sure you’ve outlined your own somewhere. Curious to know how your perspective on blogging process has changed over the years.

  101. Ahmad Imran Avatar

    While it is a brilliant post for new and intermediate bloggers, there is a very interesting point you mentioned.

    Write first and then research.

    I am keen to try that. You are right that this way you want your own thoughts and style to come out naturally rather than influenced by the research and common opinion.

    Thanks for a lovely post Dustin.

  102. John Saddington Avatar

    Love you outlining this process for others, so helpful!

Leave a Reply